
Dining room chairs loosen because the screws, bolts, dowels, and glue joints that hold legs, stretchers, and seats to the frame work free with regular use. To tighten dining room chairs, turn the chair upside down, inspect every joint and fastener, tighten loose bolts and screws, re-glue separated wood joints with carpenter’s glue and clamps, add corner braces where the frame allows, and replace stripped hardware with slightly larger fasteners or wood filler and dowels before reassembling.
Key Takeaways
- Flip the chair over and check every leg, stretcher, and seat screw before you start.
- Use a screwdriver or wrench that fits the fastener head exactly so you don’t strip it.
- Re-glue separated wood joints with carpenter’s glue, then clamp them for at least 30 minutes.
- Replace stripped screws with longer or thicker screws, or fill the hole with wood glue and toothpicks first.
- Add metal corner braces to weak frame corners if the wood will accept screws without splitting.
- Test each chair by sitting on it and rocking gently before putting it back at the table.
Tools You Need
You don’t need a full workshop to tighten most dining chairs. Gather these items first so you aren’t hunting for them mid-job.
- Phillips and flat-head screwdrivers in several sizes
- Adjustable wrench or socket set for bolts and nuts
- Cordless drill with driver bits (optional but helpful)
- Carpenter’s wood glue (yellow glue)
- Bar clamps or spring clamps
- Clean rags and a putty knife for wiping excess glue
- Sandpaper (120-grit)
- Replacement screws, bolts, washers, and wood dowels
- Wood filler or epoxy putty for stripped holes
- Metal corner braces and short wood screws (optional)
- Flashlight to see inside dark joints
Power drill use saves time, but a hand screwdriver gives you more feel for when a screw is snug versus stripped.
Inspect the Chair Before Tightening
Turn each chair upside down on a padded surface so you don’t scratch the finish or the floor. Look at every connection point: where legs meet the seat frame, where stretchers join the legs, and where the seat is screwed to the frame. Wiggle each leg and stretcher by hand. Any movement means a loose joint or fastener. Mark the problem spots with masking tape or a sticky note so you don’t miss any when you start repairs.
Check for these common problems:
- Loose machine bolts with nuts underneath the seat
- Wood screws that have turned but no longer grip
- Glued dowel joints that have separated
- Cracked or split wood around screw holes
- Missing or broken stretchers between legs
- Worn glides or caps that let legs shift
Tighten Screws and Bolts
Start with the easy wins. Use a screwdriver that matches the screw head exactly; a too-small driver will cam out and strip the Phillips recess. Turn each screw clockwise until it’s snug, then give it a quarter turn more. Don’t overtake—stripping the hole makes the problem worse.
For bolts with nuts, hold the nut with a wrench while you turn the bolt head, or hold the bolt and turn the nut. If a bolt spins freely, the nut may be lost or the threads may be stripped. Remove the hardware and take it to a hardware store to match the size, thread pitch, and length.
Pro Tip: If a screw spins in place, remove it, dip the threads in wood glue, insert a wooden toothpick or matchstick (without the head) into the hole, break it off flush, and reinsert the screw. The wood fibers give the threads something to bite into.
Repair Glued Wood Joints
Many dining chairs use mortise-and-tenon or doweled joints held together by glue. Over decades, that glue dries out and the joint separates. To repair it:
- Separate the joint gently if it’s still partially connected. Don’t force it if the wood is fragile.
- Scrape old glue out of the joint with a putty knife. New glue won’t bond to old, cured glue.
- Apply a thin, even layer of carpenter’s glue to both surfaces.
- Reassemble the joint and wipe away squeezed-out glue with a damp rag.
- Clamp the joint tightly. Use bar clamps for long stretchers and spring clamps or strap clamps for round legs.
- Leave the clamps on for at least 30 minutes, preferably two hours. Let the chair sit unclamped and unused for 24 hours before sitting on it.
If a dowel has snapped or is missing, drill out the old hole slightly, glue in a new wood dowel of the same diameter, trim it flush, sand it smooth, and reassemble.
Deal With Stripped Holes
Stripped screw holes are common on chairs that have been tightened repeatedly. When the wood fibers around the hole are crushed, a screw will spin without tightening.
Options, from simplest to most permanent:
- Move the screw slightly and drive a new hole nearby if there’s enough wood.
- Fill the hole with wood glue and several toothpicks or wooden matchsticks, let dry, trim flush, then drive the screw back in.
- Use a slightly larger diameter screw of the same length.
- Fill the hole with wood filler or epoxy putty, let it cure completely, drill a pilot hole, and drive a new screw.
Warning: Don’t keep driving the same screw into a stripped hole. You’ll enlarge the hole until the screw has nothing to hold to, and the leg may detach entirely.
Add Corner Braces for Extra Strength
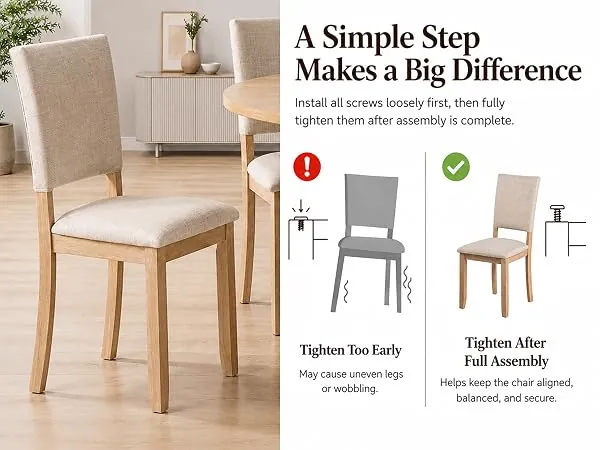
If a chair frame corner is loose and the wood is too damaged for glue alone, a metal corner brace can restore strength. This works best on painted chairs or chairs where the brace will be hidden underneath.
- Position the brace so one wing sits on each piece of the frame.
- Mark the screw holes with a pencil.
- Drill pilot holes slightly smaller than the brace screws so the wood doesn’t split.
- Screw the brace in place with short wood screws.
- Check that the brace doesn’t interfere with the floor or with other chairs when tucked in.
Corner braces add visible hardware, so use them only where they won’t show or where the chair is already painted.
Tighten the Seat to the Frame
The seat itself can loosen from the frame, causing a wobble even when the legs are solid. Flip the chair and look up at the underside of the seat. You’ll usually see screws running up through the frame into the seat bottom, or bolts passing through with nuts on top.
Tighten each fastener. If the seat has wooden blocks or corner blocks glued between the seat and frame, check those glue joints too. Re-glue any separated blocks and clamp them while the glue dries.
If the seat is upholstered and stapled to the frame, you may need to remove the dust cover on the underside to reach the fasteners. Replace the cover when you’re done.
Check and Replace Leg Glides
Loose-feeling chairs sometimes have nothing wrong with the frame—the glides or caps on the bottom of the legs are worn, missing, or uneven. This makes one leg shorter than the others, so the chair rocks.
- Pull off old plastic or metal glides by hand or with pliers.
- Clean the leg bottom.
- Press on new glides of the same size, or screw in new leveling glides if the legs have threaded inserts.
- If the legs are uneven because of wear, sand the longer legs slightly or add felt pads to the shorter leg until all four legs touch the floor evenly.
When to Replace Parts Instead of Tightening
Some damage can’t be fixed by tightening. Replace the part if you see:
- A leg that’s cracked through or split lengthwise
- A stretcher that’s snapped in two
- Threads so stripped that a new screw still won’t hold
- A seat frame that’s broken or warped
- Glue joints where the wood fibers are rotted or crushed beyond repair
Take the broken part to a hardware store or furniture repair shop to match the replacement. If the chair is an antique or has sentimental value, consider a professional furniture restorer rather than a DIY fix.
Maintenance Schedule
Tightening once isn’t a permanent solution. Chairs loosen again with use, especially in homes with children or heavy daily traffic.
| Task | Frequency | What to Do |
|---|---|---|
| Quick wiggle test | Monthly | Grab each leg and stretcher; note any movement |
| Tighten visible screws | Every 6 months | Snug any fasteners that have turned loose |
| Deep inspection | Once a year | Flip chairs over, check all joints, glue, and glides |
| Re-glue major joints | Every 3–5 years or as needed | Regroup separated dowel and mortise joints |
Write the date on a piece of masking tape under the seat so you know when you last serviced each chair.
Common Problems and Fixes
| Symptom | Likely Cause | Fix |
|---|---|---|
| Chair wobbles side to side | Loose stretcher or leg joint | Tighten bolts; re-glue joint; add corner brace |
| Seat sinks or shifts | Loose seat-to-frame screws | Tighten screws; re-glue corner blocks |
| Screw spins but won’t tighten | Stripped wood hole | Fill with glue and toothpicks; use larger screw |
| One leg shorter than others | Worn or missing glide | Replace glide; sand longer leg or add pad |
| Cracking sound when sitting | Separated glue joint | Disassemble, clean, re-glue, clamp, dry 24 hours |
Related guides
Frequently Asked Questions
How do I know if a chair is worth repairing?
If the frame is solid, the wood isn’t cracked or rotted, and the joints can be re-glued, most dining chairs are worth tightening. A chair with multiple snapped legs or severe rot is usually better replaced.
Can I tighten a chair without flipping it over?
You can reach some seat screws from the top, but you can’t properly inspect leg joints, stretcher connections, or underside bolts without turning the chair upside down.
What glue should I use for chair joints?
Use standard carpenter’s wood glue (yellow aliphatic resin glue). It dries strong, sands easily, and is the standard choice for furniture repair. Avoid super glue, which is brittle and doesn’t fill gaps well.
How long should clamps stay on a reglued joint?
Leave clamps on for at least 30 minutes, and let the chair rest unused for 24 hours before putting weight on it. Full glue strength takes a day to develop.
Will adding corner braces ruin the look of my chair?
Braces are visible metal hardware. Use them underneath the seat or on painted chairs where they won’t show. On fine wood chairs, re-gluing the joint is the better-looking repair.
How often should I check my dining chairs?
Check them every six months, or sooner if you notice a wobble. Heavy use loosens fasteners faster than occasional use.
Conclusion
Tightening dining room chairs is a straightforward repair that most homeowners can handle with basic tools and a little patience. Start with one chair, work through the joints and fasteners methodically, and let any glue dry fully before returning the chair to the table.