
The distance between your toilet flange and the wall is a critical measurement that dictates not only the proper installation of your toilet but also its stability and functionality. Often overlooked by DIYers and even some professionals, this seemingly small detail can prevent leaks, wobbles, and costly repairs down the line.
Ensuring the correct spacing is fundamental to a secure and leak-free bathroom fixture, and understanding the standard measurements and influencing factors is key to a successful plumbing project.
This comprehensive guide will break down the essential aspects of toilet flange-to-wall distance, covering standard measurements, how to measure it accurately, common issues arising from incorrect spacing, and how to rectify them. Whether you’re installing a new toilet, replacing an old one, or troubleshooting a persistent leak, mastering this measurement will save you time, money, and potential bathroom headaches.
Key Takeaways
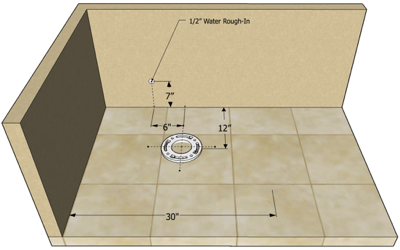
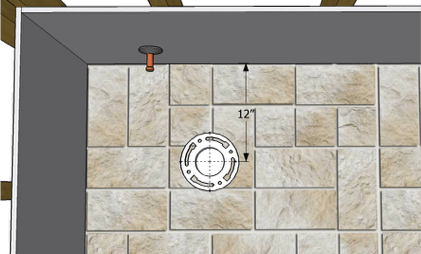
- The standard distance for a toilet flange from the finished wall is 12 inches.
- Variations exist, with 10-inch and 14-inch rough-ins also being common, requiring specific toilet bowl types.
- Accurate measurement involves finding the center of the flange’s horn and the finished wall surface.
- An incorrect flange-to-wall distance can lead to toilet instability, leaks, and improper sealing.
- Offset flanges and flange spacers are solutions for correcting minor distance discrepancies.
- Always consult local building codes for specific requirements.
Credit: www.hammerpedia.com
Understanding Toilet Flange Placement: The 12-inch Standard
The toilet flange, also known as a closet flange, is the vital fitting that connects your toilet to the drainpipe and anchors it to the floor. Its placement is governed by established plumbing codes and best practices to ensure a secure and watertight seal. The most common and widely accepted standard for toilet flange placement is 12 inches from the finished wall. This measurement is not arbitrary; it’s designed to accommodate the vast majority of standard toilet bowls, allowing for adequate clearance behind the tank for access and aesthetics, as well as proper connection to the waste pipe.
This 12-inch measurement refers to the distance from the center of the flange’s horn (the part that connects to the drainpipe) to the finished wall surface. The “finished wall” is crucial, as it accounts for any drywall, tile, or other wall coverings that will be present when the bathroom is complete. Installing the flange before the wall is finished requires an adjustment for the thickness of the wall material. This standard ensures that the toilet bowl sits flush against the wall without being too far away or pressing against it, which could compromise the wax ring seal.
The Importance Of The Finished Wall Measurement
It’s paramount to understand that the measurement is taken from the finished wall. This means if you are installing the flange before the drywall is up, you need to account for its thickness. For example, if your drywall is typically 1/2 inch thick, you would position the center of the flange horn 11.5 inches from the studs (which represent the rough wall). This ensures that once the drywall is installed, the flange will be exactly 12 inches from the finished surface. This detail is often a point of confusion for DIYers, leading to common installation errors. Always consider the final state of your bathroom walls when determining the flange’s position.
Rough-in Measurements Explained
While 12 inches is the standard, plumbing systems often use what’s called a “rough-in” measurement. This refers to the distance from the drainpipe’s center to the wall *before* any wall finishes are applied. A 12-inch rough-in means the drainpipe’s center is 12 inches from the studs or framing.
When the wall is finished, this will result in the flange being 12 inches from the finished wall. However, other rough-in sizes exist.
- 10-inch rough-in: This is less common but used in smaller bathrooms or specific layouts where space is limited. A 10-inch rough-in typically requires a “short” or “compact” toilet designed for this spacing.
- 14-inch rough-in: This is also less common and usually found in older homes or specific custom builds. It requires an “extra-long” or “one-piece” toilet designed to span this larger gap.
Understanding your rough-in measurement is the first step in selecting the correct toilet and ensuring proper installation. If you’re unsure about your rough-in, measuring from the center of the drainpipe to the studs is the most reliable method before wall coverings are applied.
Credit: terrylove.com
Measuring The Toilet Flange To Wall Distance Accurately
Accurate measurement is the cornerstone of proper toilet installation. When dealing with a toilet flange, precision is key to preventing leaks and ensuring the toilet sits correctly. The process involves identifying the correct reference points and using a reliable measuring tool.
Step-by-step Measurement Guide
- Identify the Finished Wall: If the walls are already finished, this is straightforward. If the walls are not yet finished (e.g., studs only), you’ll need to estimate or measure the thickness of the material that will be added (e.g., drywall, tile).
- Locate the Center of the Flange Horn: The flange horn is the part of the fitting that the toilet’s outlet connects to. You need to find the exact center of this circular opening.
- Use a Measuring Tape: Place the end of your measuring tape against the finished wall surface. Extend the tape measure straight out, perpendicular to the wall, until it touches the center of the flange horn.
- Read the Measurement: Note the measurement indicated on the tape measure. This is your flange-to-wall distance.
Tools For Accurate Measurement
While a standard tape measure is usually sufficient, certain tools can enhance accuracy, especially in tight spaces or when dealing with slightly irregular surfaces:
- Standard Tape Measure: The most common tool. Ensure it’s a reliable brand and in good condition.
- Laser Measure: For longer distances or if you need to be precise without touching surfaces, a laser measure can be useful, though less practical for the tight confines of a toilet flange.
- Carpenter’s Square: Can help ensure your tape measure is perfectly perpendicular to the wall, increasing accuracy.
- Straight Edge: If the wall surface is uneven, a straight edge can provide a consistent reference point.
Pro Tip: When measuring from a rough wall (studs), remember to add the thickness of your planned wall finish (e.g., 1/2-inch drywall, 1/4-inch backer board, 1/2-inch tile) to the measurement from the studs to get the *finished wall* distance.
Common Measurement Pitfalls
Several common mistakes can occur during measurement:
- Measuring to the wrong wall: Always measure to the *finished* wall, not the studs or rough framing.
- Not measuring to the center of the horn: Measuring to the edge of the flange or the drainpipe itself will result in an inaccurate reading.
- Measuring at an angle: The tape measure must be held perfectly perpendicular to the wall for an accurate reading.
- Ignoring wall thickness: Failing to account for drywall, tile, or other finishes when the flange is installed before the walls are complete.
Credit: www.hammerpedia.com
Why Correct Flange-to-wall Distance Matters
The toilet flange-to-wall distance is not merely a guideline; it’s a critical factor that directly impacts the functionality, stability, and longevity of your toilet installation. Deviations from the standard can lead to a cascade of problems, ranging from minor inconveniences to significant plumbing failures.
Preventing Leaks And Ensuring A Proper Seal
The primary function of the wax ring (or wax-free alternative) is to create a watertight seal between the toilet base and the flange. This seal prevents wastewater from escaping onto your bathroom floor. When the toilet is positioned correctly, the wax ring is compressed evenly around the flange horn.
- Too Far from the Wall: If the flange is too far from the wall (e.g., a 14-inch rough-in with a standard 12-inch toilet), the toilet bowl will not sit flush. This leaves a gap between the toilet base and the wall, and more importantly, it prevents the toilet from seating properly on the flange. The wax ring will not be compressed uniformly, leading to an inadequate seal. This can result in slow leaks around the base of the toilet, often unnoticed until significant water damage occurs. The toilet may also wobble due to the uneven seating.
- Too Close to the Wall: If the flange is too close to the wall (e.g., a 10-inch rough-in with a standard 12-inch toilet), the toilet tank might press against the wall, or the bowl might not fit correctly. This can also interfere with the proper seating of the toilet on the flange and the even compression of the wax ring. While less common for leaks to originate from this specific issue, it can cause damage to the tank or wall, and the toilet may not sit securely, leading to instability.
Ensuring Toilet Stability And Preventing Wobbling
A toilet is a heavy fixture, and it relies on its connection to the floor flange for stability. The flange acts as an anchor. When the toilet is installed over a correctly positioned flange, the base of the toilet sits squarely on the floor, and the bolts through the flange secure it firmly.
If the flange-to-wall distance is incorrect, the toilet may not sit flush against the wall or may be positioned awkwardly over the flange. This misalignment can cause the toilet to rock or wobble when used. Over time, this constant movement can:
- Break the wax seal, leading to leaks.
- Crack the porcelain base of the toilet.
- Loosen the flange from the drainpipe, causing more severe leaks into the subfloor or ceiling below.
- Damage the flooring around the toilet base.
Accommodating Toilet Design And Tank Clearance
Toilet manufacturers design their bowls and tanks with specific dimensions in mind. The standard 12-inch rough-in allows for the most common toilet designs, where the back of the tank is a few inches away from the wall. This clearance is essential for:
- Access: Allowing space for cleaning and maintenance behind the tank.
- Water Supply Line: Providing room for the water supply line connection without kinking or obstruction.
- Aesthetics: Ensuring the toilet looks proportionate and fits well within the bathroom space.
When the flange is too close to the wall, a standard toilet might not fit at all, or the tank may press against the wall, potentially damaging it or the tank itself. Conversely, if the flange is too far, the toilet will sit awkwardly away from the wall, creating an unsightly gap and potentially making cleaning difficult.
Common Issues With Incorrect Flange-to-wall Distances And Solutions
When the toilet flange is not positioned at the correct distance from the wall, homeowners and plumbers often encounter several predictable problems. Fortunately, many of these issues have viable solutions, though some are more complex than others.
Toilet Rocking Or Instability
One of the most immediate and noticeable problems arising from an incorrect flange distance is a wobbly toilet. This typically happens when the flange is too far from the wall, causing the toilet bowl to sit unevenly.
Solution:
The most common fix for a toilet that wobbles due to distance is to use flange spacers or toilet shims. These are typically plastic or rubber inserts that fill the gap between the toilet base and the floor, providing a stable, level surface. In severe cases, if the flange is significantly off, you might need to remove the toilet, assess the flange height and position, and potentially replace the flange with one that is correctly positioned or use an offset flange.
Leaks At The Base Of The Toilet
Leaks are a serious consequence of improper flange placement. If the toilet doesn’t sit flush or the wax ring isn’t compressed correctly due to the distance issue, wastewater can seep out.
Solution:
First, attempt to re-seat the toilet with a new wax ring. This involves removing the toilet, cleaning off the old wax, and carefully re-installing it, ensuring it sits level and tight against the wall. If the problem persists, the issue is likely with the flange’s position relative to the wall.
- Flange Too Far: If the gap is too large for a standard toilet, you might need to install an offset flange. These flanges have an offset horn that allows you to shift the toilet’s position slightly to better align with the drainpipe. Alternatively, you might need to consider a toilet specifically designed for a longer rough-in (e.g., 14-inch).
- Flange Too Close: If the toilet tank hits the wall, you may need to use a toilet designed for a shorter rough-in (e.g., 10-inch) or, in some cases, a flange spacer that raises the flange and effectively moves the drainpipe connection further from the wall, allowing the toilet to sit correctly. However, this can be a complex fix and may require professional plumbing expertise.
Gaps Between Toilet And Wall
An unsightly gap between the back of the toilet bowl/tank and the wall is a clear indicator of an incorrect rough-in measurement or flange placement.
Solution:
The ideal solution is to install the correct toilet for the rough-in measurement. If you have a 10-inch rough-in, use a 10-inch toilet. If you have a 12-inch rough-in, use a 12-inch toilet. If you already have a toilet installed and there’s a gap, you can try to fill it with decorative trim or caulk, but this is a cosmetic fix. For a functional fix, you’d need to remove the toilet and adjust the flange position if possible, or replace the toilet with one that matches the rough-in.
Difficulty Installing The Toilet
Sometimes, the wrong flange distance simply makes it physically difficult or impossible to install the toilet properly. Bolts might not align, or the toilet bowl might hit the wall before it can seat on the flange.
Solution:
This is a sign that the rough-in measurement is incompatible with the toilet. You must either:
- Adjust the flange: If possible, move the flange to match the required rough-in for your toilet. This might involve cutting into the floor and subfloor to reposition the drainpipe and flange.
- Replace the toilet: Choose a toilet designed for your existing rough-in measurement.
Here’s a comparison of common rough-in measurements and the typical toilet types they require:
| Rough-In Measurement | Typical Toilet Type Required | Common Issues if Mismatched | Potential Solutions |
|---|---|---|---|
| 10-inch | Compact, Short, or 10-inch Rough-In Toilet | Standard toilet tank hits wall; difficulty seating toilet; potential leaks. | Use correct toilet; offset flange (rarely ideal); adjust flange position (major work). |
| 12-inch | Standard Toilet | Toilet sits too far from wall; gap behind tank; potential instability and leaks. | Use correct toilet; flange spacers; shims; offset flange (if slight adjustment needed). |
| 14-inch | Extended Rough-In or 14-inch Toilet | Toilet sits too close to wall; tank may not fit; difficulty seating toilet. | Use correct toilet; offset flange; adjust flange position (major work). |
Using Offset Flanges And Spacers To Correct Distance
When faced with minor discrepancies in the toilet flange-to-wall distance, specialized plumbing fittings and accessories can often provide a practical solution without requiring major re-piping. Offset flanges and flange spacers are designed to address common installation challenges related to positioning.
Offset Flanges Explained
An offset flange is a type of toilet flange that allows you to shift the position of the toilet’s connection to the drainpipe. Instead of the horn being directly in the center of the flange base, it’s offset to one side. These flanges are particularly useful when the drainpipe is not perfectly centered within the rough-in area, or when the rough-in measurement is slightly off.
Types of Offset Flanges:
- Standard Offset Flanges: These typically offer an offset of about 1 to 2 inches in one direction (e.g., forward/backward or side-to-side). They are designed to connect to a standard 3-inch or 4-inch drainpipe.
- Double Offset Flanges: These provide a greater degree of adjustment, allowing for more significant repositioning of the toilet.
When to Use an Offset Flange:
- When the drainpipe is slightly off-center for the intended toilet position.
- To correct a rough-in measurement that is off by 1-2 inches. For example, if you have a 13-inch rough-in and want to use a standard toilet, an offset flange might help bridge the gap.
- To fine-tune the toilet’s position for better aesthetics or easier bolt alignment.
Limitations:
Offset flanges are not a universal fix. They are designed for specific offsets and cannot correct large measurement errors. Attempting to force a toilet into position with an offset flange beyond its designed capacity can still lead to improper sealing and instability.
Always ensure the toilet still seats correctly and the wax ring can form a proper seal.
Flange Spacers And Toilet Shims
Flange spacers are typically rings or discs that fit between the toilet flange and the toilet base. They are used to raise the height of the toilet connection. This is primarily useful when the flange is too low relative to the finished floor height, but they can also indirectly help with distance issues in some scenarios by allowing the toilet to seat more firmly.
Toilet shims, on the other hand, are used to level a toilet that rocks due to an uneven floor or, as mentioned earlier, an incorrect flange-to-wall distance. They are inserted under the base of the toilet.
When to Use Spacers and Shims:
- Spacers: Primarily used to increase the height of the flange if it’s below the finished floor level, ensuring a good seal with the wax ring. Some spacers are designed to also provide a slight offset capability.
- Shims: Used to stabilize a wobbly toilet, filling gaps between the toilet base and the floor. This is a common solution for toilets that sit slightly away from the wall due to a larger-than-standard rough-in.
Important Considerations:
- Wax Ring Compression: When using spacers, ensure that the total height (flange + spacer + toilet base) still allows for proper compression of the wax ring. Too much height can prevent a good seal.
- Stability: Shims provide stability but do not fix the underlying cause of the wobble. If the wobble is severe, it’s best to address the flange position or use a toilet appropriate for the rough-in.
- Aesthetics: Shims can sometimes be visible if not installed carefully, and they don’t close the gap between the toilet and the wall.
Example: If you have a 13-inch rough-in and a standard toilet that leaves a 1-inch gap, you might use shims to fill this gap under the base for stability and to prevent rocking. This doesn’t fix the distance issue but makes the toilet usable and stable.
Adjusting The Flange Position: When And How
In ideal circumstances, the toilet flange is installed precisely at the correct distance from the wall during the initial plumbing rough-in. However, renovations, errors, or unforeseen issues can necessitate adjusting the flange’s position after it has been installed or even after a toilet has been fitted.
This is a more involved process that often requires cutting into the floor and potentially the wall.
Situations Requiring Flange Adjustment
- Incorrect Initial Measurement: The most common reason is a measurement error during the initial installation, resulting in a flange that is too close or too far from the wall.
- Renovations: When changing wall finishes (e.g., adding thick tile or wainscoting), the “finished wall” distance can change, requiring the flange to be moved.
- Drainpipe Repositioning: Sometimes, the drainpipe itself needs to be moved for layout reasons, which will inherently require adjusting the flange’s location.
- Damage or Wear: An old or damaged flange might need replacement, offering an opportunity to correct its position.
Methods For Adjusting Flange Position
Adjusting a toilet flange typically involves accessing the drainpipe beneath the floor.
- For a Flange Too Far from the Wall:
- Access: You’ll need to cut an opening in the floor to expose the drainpipe and the existing flange. The size of the opening depends on the complexity of the existing plumbing.
- Repositioning the Drainpipe: If the drainpipe can be moved closer to the wall (which is often the most challenging part), new pipe fittings (like elbows and couplings) will be needed to extend or reroute the pipe. This may involve cutting the existing pipe and cementing new sections.
- Installing a New Flange: Once the drainpipe is in the correct position, a new flange is installed and secured to the floor. Ensure the new flange is at the correct height relative to the finished floor.
- Patching the Floor: After the plumbing is complete and tested, the floor opening is patched.
- For a Flange Too Close to the