
Assembling a dirt bike from a crate takes about two to three hours, costs around $20 to $40 for basic shop fluids, and needs care because loose chassis bolts can cause severe crashes.
Tools to assemble your dirt bike
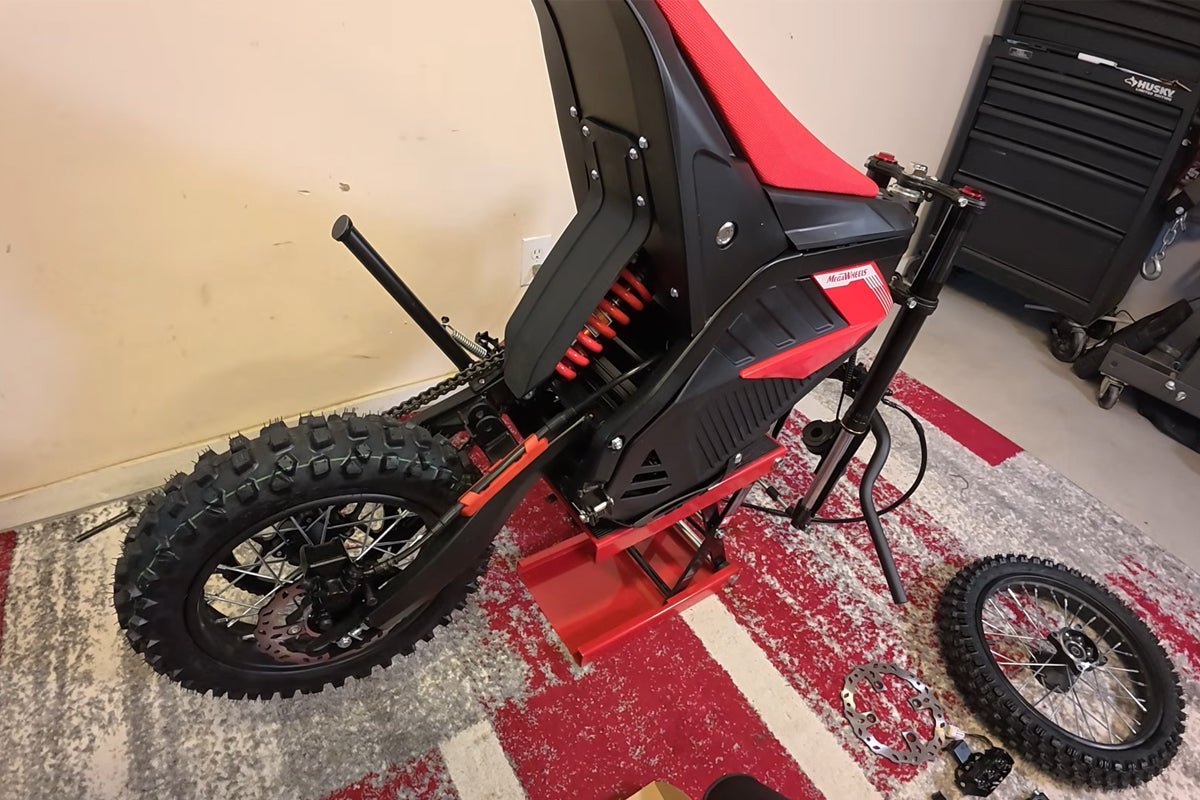
| Item | How much | Why it’s needed | A substitute |
|---|---|---|---|
| Metric socket set | 1 set (8mm to 19mm) | Tightens frame, wheel, and clamp bolts | Metric box wrenches |
| Torque wrench | 1 tool (10-80 ft-lb) | Prevents stripped threads and loose axles | none — don’t swap this |
| Bike stand | 1 stand (holds bike) | Keeps frame level without wheels | Solid wooden milk crate |
| Medium threadlocker | 1 bottle (blue formula) | Stops loose bolts from engine vibration | none — don’t swap this |
| High-pressure grease | 1 tub (waterproof) | Lubricates axle shafts and steering bearings | Standard chassis grease |
Before you start
- Clear a flat workspace that measures at least ten feet by eight feet so you can move around the frame safely.
- Move cardboard packing materials and metal crate banding directly into the trash so you don’t trip over them.
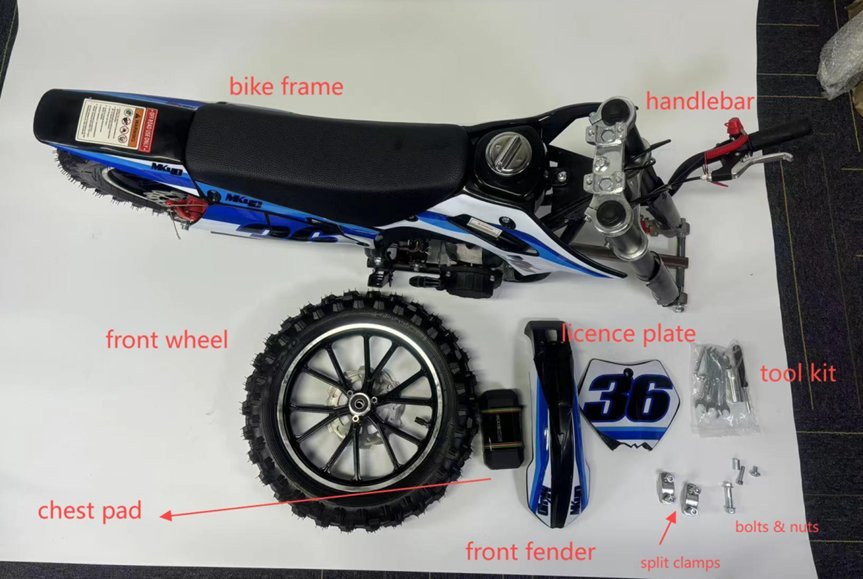
- Cut the zip-ties holding the front wheel and handlebar to the frame, taking care not to scratch the paint or cut hydraulic brake lines.
- Skipping the unboxing hardware inventory is a mistake people actually make, and it costs them several days of build downtime when a missing axle nut halts the process.
- Stop if your frame or front forks show bent metal from shipping damage; contact your shipping carrier or dealer immediately for replacement parts rather than trying to bend them back.
Step by step
- Lift the crated motorcycle frame out of the metal shipping cage and set it squarely onto your center stand so the rear wheel clears the ground by two inches.
- Unbolt the handlebar clamps with a 10mm socket, center the handlebar inside the lower clamps, align the crossbar marks, and torque the four clamp bolts evenly to 18 foot-pounds.
- Slide the front fork tubes up through the triple clamps if they arrived loose, setting the top cap flush with the top clamp surface, then tighten the pinch bolts to 15 foot-pounds.
- Coat the front wheel axle completely with a thin layer of waterproof grease using your fingers to prevent rust and ease future wheel removal.
- Lift the front wheel between the fork legs, slide the brake rotor carefully between the front caliper brake pads without forcing them, and push the greased axle completely through the hub.
- Thread the front axle nut onto the threads by hand, tighten it with an appropriately sized socket, and torque it to 45 foot-pounds using your torque wrench.
- Pump the front brake lever four to five times until firm pressure builds up and the pads clamp securely onto the steel rotor face.
- Align the rear shock linkage bolt holes if unbolted for shipping, apply blue threadlocker to the bolt threads, slide the pin through, and torque the nut to 35 foot-pounds.
How to know it worked
A properly built dirt bike sits upright on its wheels with smooth rolling motion and zero wheel wobble. Spin the front wheel by hand; it should turn freely for several rotations without dragging hard against the brake pads. Sit on the seat to compress the suspension; both the front forks and the rear shock should compress smoothly and return without squeaking or binding. Check the handlebar by turning it fully from left to right; it must sweep cleanly without pulling cables tight or pinching electrical wires against the frame stop. The Consumer Product Safety Commission off-highway vehicle safety guidelines explain why proper steering and structural assembly prevent off-road vehicle injuries. If your brake lever touches the grip, stop and bleed the line.
If something goes wrong
| What happened | Why | What to do |
|---|---|---|
| Front wheel won’t turn | Brake pads pinched the rotor incorrectly | Loosen caliper bolts and realign pads |
| Handlebars twist while riding | Clamp bolts were tightened unevenly | Loosen bolts and retighten with cross-pattern |
| Engine fails to crank over | Handlebar kill switch is grounded out | Check ground wire connector behind plate |
| Front forks feel stiff | Triple tree pinch bolts over-torqued | Loosen bolts and torque to manual |
| Rear chain slips off sprocket | Axle blocks set too far forward | Loosen axle and tighten adjuster bolts |
How often to do this
Full bike assembly happens only once when you buy a new crate motorcycle or completely rebuild an old frame. However, you must check every major bolt after your first 30 minutes of engine run time because brand-new bolts stretch slightly and seat under vibration. How fast parts loosen depends on two things: engine displacement and riding terrain. A heavy four-stroke engine creates high vibration that loosens frame fasteners quickly, while rocky tracks jolt the steering stem harder than smooth dirt.
Frequently asked questions
Can I assemble a dirt bike without a torque wrench?
No, because guessing bolt tightness leads to stripped aluminum threads or loose axles that cause serious crashes. A torque wrench applies exact clamping pressure specified by the manufacturer. If you don’t own one, buy or borrow a basic 3/8-inch drive torque wrench before starting your assembly.
How long does it take to assemble a new dirt bike?
About two to three hours for a standard youth or adult trail bike straight out of the crate. If your model ships completely disassembled with unbolted shocks, wiring harnesses, and dry carburetors, allow about half as long again. Working slowly prevents scratched plastics and ruined bolt threads.
Do crated dirt bikes come with engine oil inside?
Factory oil protects internal steel gears from rust during ocean shipping rather than lubricating hot engine parts. Drain the shipping oil, replace the crush washer, and add fresh motorcycle-specific four-stroke oil.
What happens if the drive chain is set too tight?
A tight chain breaks your engine countershaft bearings and ruins the rear hub as the rear suspension compresses over bumps. Dirt bike swingarms move along an arc that stretches the chain tightest at mid-travel.
Why is the front brake lever soft after installing the front wheel?
The caliper pistons were pushed back during transit to allow room for the metal rotor spacer. Pump the front brake lever four or five times against the handlebar until the pads seat against the rotor. If pressure doesn’t return, inspect the line for fluid leaks.
Does it matter if I assemble the bike on a kickstand?
Yes, you can’t safely mount the front forks, align the handlebars, or true the front axle while resting the bike on a side stand. A side stand leans the chassis weight off-center. Always balance the frame belly flat across a stable motorcycle work stand.
Final Thoughts
Before you head out to the trails, double-check that every bolt is tight and your chain has the right amount of slack. Don’t rush your first ride; take it easy to let the engine break in properly. You’ll have a much smoother experience if you’re patient and keep everything well-maintained.
Related guides