
Installing a bike rack on minivan models correctly takes about 20 to 30 minutes, requires only basic hand tools, and rates as an easy project.
Tools for installing your bike rack
| Item | How much | Why it’s needed | A substitute |
|---|---|---|---|
| Hitch bike rack | 1 unit | Holds bicycles securely behind van | none — don’t swap this |
| Hitch pin and clip | 1 set | Locks rack shank inside receiver | Locking threaded hitch bolt |
| Adjustable wrench | 1 tool | Tightens anti-rattle bolts firmly | Correct-size box socket wrench |
| Clean shop rag | 1 piece | Wipes dirt from receiver tube | Clean paper towel piece |
| Anti-rattle hitch clamp | 1 unit | Stops rack wobble while driving | Threaded receiver hitch lock |
Before you start
- Turn off the vehicle engine, shift into park, and set the emergency parking brake.
- Wipe clean the inside of the hitch receiver tube to clear road grit.
- Turn off automatic power liftgate controls on your minivan’s dashboard to prevent accidental trunk openings.
- Check your vehicle owner’s manual or the hitch manufacturer’s documentation for the receiver’s tongue weight rating before loading anything.
- If your minivan lacks a trailer hitch receiver, you can’t mount a hitch-style rack; contact an auto shop to install the hitch structure first.
Step by step
-
Wipe the inside of the square hitch tube using a dry rag to remove loose dirt and small stones. Check that the interior metal feels smooth to the touch.
-
Slide the rack shank directly into the hitch receiver opening until the mounting holes line up. You’ll feel the metal stop moving forward once it hits the internal collar.
-
Align the pre-drilled pin holes on the receiver tube and rack shank using a clear line of sight. Look through the hole until daylight passes straight across both parts.
-
Insert the hitch pin or anti-rattle bolt straight through both matching holes from left to right. Push it completely through until the retaining groove clears the opposite side.
-
Tighten the anti-rattle bolt clockwise using an adjustable wrench until the metal fits flush. Turn it firmly until the rack body no longer rocks side to side inside the hitch.
-
Fasten the hairpin cotter clip through the small hole at the end of the hitch pin. Pull back lightly on the clip to confirm it can’t slip free.
-
Install the external anti-rattle U-bolt clamp across the receiver collar if your rack model came with one. Tighten both nuts evenly using your wrench until the plate rests flat.
-
Unfold the rack arms upward and listen for the spring-loaded locking pin to snap shut. The arms should remain completely rigid when you press down with your hands.
-
Test the rear hatch clearance by unlocking the fold-down hinge pin and tilting the empty rack backward. Open the minivan hatch slowly to ensure the door edge misses the rack by at least 2 inches.
How to know it worked
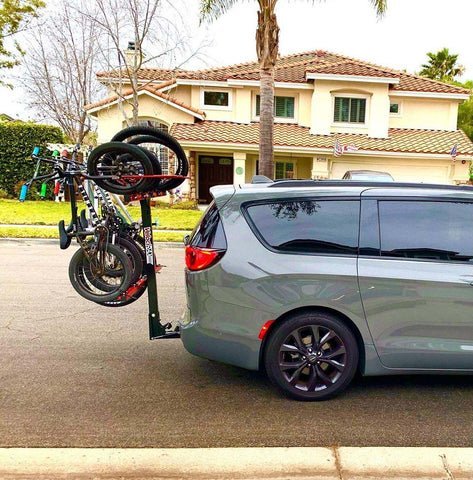
Grab the main vertical mast of the rack with both hands and shake it firmly. If installed properly, the rack will move the entire minivan on its suspension rather than wobbling inside the receiver tube. There should be zero metallic clunking sounds when you push up, down, or sideways. The safety pin must sit fully through both hitch walls, with its retaining clip locked over the tip. When you fold the rack flat or down, the rear liftgate must open without striking any rack parts. If the shank twists inside the hitch or emits loud rattles, the anti-rattle bolt requires extra turns with a socket wrench.
If something goes wrong
| What happened | Why | What to do |
|---|---|---|
| Pin holes won’t align | Shank inserted too deep or shallow | Slide shank slowly while watching hole |
| Rack wobbles inside receiver | Anti-rattle bolt is loose | Tighten bolt using correct socket size |
| Rear hatch hits rack | Hitch receiver sits too far back | Add approved hitch extension bar |
| Shank won’t slide in | Dirt or rust inside receiver | Clean tube using wire brush first |
| Backup sensors beep constantly | Rack blocks rear bumper radar | Turn off park-assist in car settings |
How often to do this
Perform these mounting steps each time you attach the rack for a trip. Two conditions change this schedule: driving over unpaved gravel roads loosens threaded bolts much faster due to continuous vibration, and wet winter road salt corrodes hitch pins if left untouched. For highway transit, the NHTSA safe driving guide recommends inspecting all external vehicle loads and carrier attachments prior to long-distance travel.
Frequently asked questions
Can I open my minivan rear hatch with bikes on?
No, most racks prevent the hatch from opening when bikes are loaded. Some swing-away or drop-down models let you tilt the loaded rack backward, but you must verify that your handlebars clear the minivan glass before opening the hatch.
Does a bike rack block minivan backup cameras?
Yes, a mounted rack almost always blocks the camera’s center field of view. The camera image will show rack metal instead of the driveway, so you must rely on your side mirrors and turn your head while backing up slowly.
Is it safe to drive with an empty bike rack?
Yes, it’s safe as long as the arms are folded down and locked. An empty rack creates less wind drag, but remember it adds roughly 12 to 24 inches to the length of your vehicle when parking in tight spaces.
What happens if I forget the hitch pin clip?
The hitch pin can slide out completely from road vibration. If that happens, the entire rack and all mounted bikes will drop onto the pavement at driving speed, creating extreme danger for motorists traveling directly behind your vehicle.
Can I install a bike rack on an electric minivan?
Yes, you can install one if your electric minivan has a rated hitch receiver. However, rear-mounted bikes create aerodynamic drag that reduces your total driving range by roughly 10 to 15 percent at highway cruising speeds.
How much weight can a minivan hitch rack hold?
Between 100 and 200 pounds total, depending strictly on your specific rack model and your hitch class. This total includes the bikes and rack combined; check the hitch safety decal near your bumper to verify your actual tongue limit.
Final Thoughts
Once everything is tightened and secure, take your bike for a short test ride around the block to ensure it doesn’t wobble. It’s a great way to build confidence before you head out on a longer trip. You’ll be ready for your next outdoor adventure in no time at all.
Related guides