
A leaking toilet fill valve is a common and frustrating household plumbing issue. When water seeps from the top of this crucial component, it not only wastes water but can also lead to more significant problems like water damage and increased utility bills. Understanding the anatomy of a fill valve and the specific reasons it might leak from its upper section is the first step toward a swift and effective repair.
This seemingly small problem can escalate quickly. A continuous leak, even a slow drip from the top of the fill valve, can translate into hundreds, if not thousands, of gallons of wasted water annually. Beyond the environmental impact and the financial drain on your water bill, persistent moisture can foster mold growth and damage the toilet tank and surrounding floor.
Fortunately, most fill valve leaks are repairable with basic tools and a little know-how.
Key Takeaways
- A toilet fill valve leak from the top often indicates an issue with the valve cap seal, the float assembly connection, or a crack in the valve body.
- Common causes include a worn-out seal, improperly tightened components, or mineral buildup from hard water.
- Diagnosing the leak requires careful observation of the water flow when the tank is refilling and when it’s full.
- Most top leaks can be resolved by tightening the valve cap, replacing the cap seal, or adjusting the float arm.
- Universal fill valves offer a cost-effective and straightforward replacement option for older or irreparable valves.
- Regular toilet maintenance can prevent many fill valve issues.
Understanding The Toilet Fill Valve
The toilet fill valve, also known as the ballcock, is a vital part of your toilet’s flushing mechanism. Its primary job is to refill the toilet tank with fresh water after each flush and to shut off the water supply when the tank reaches its proper level.
It also prevents the tank from overfilling and overflowing into the overflow tube.
Anatomy Of A Fill Valve
Modern fill valves are typically plastic and consist of several key components:
- Valve Body: The main housing of the fill valve, containing the internal mechanism that controls water flow.
- Water Inlet: Where the water supply line connects to the valve.
- Float Assembly: This can be a float ball on an arm or a float cup that moves up and down the valve body. Its purpose is to detect the water level in the tank and signal the valve to shut off.
- Float Arm/Cup: Connects the float to the valve mechanism.
- Shut-off Seal/Washer: A rubber seal inside the valve that stops water flow when the float reaches the desired level.
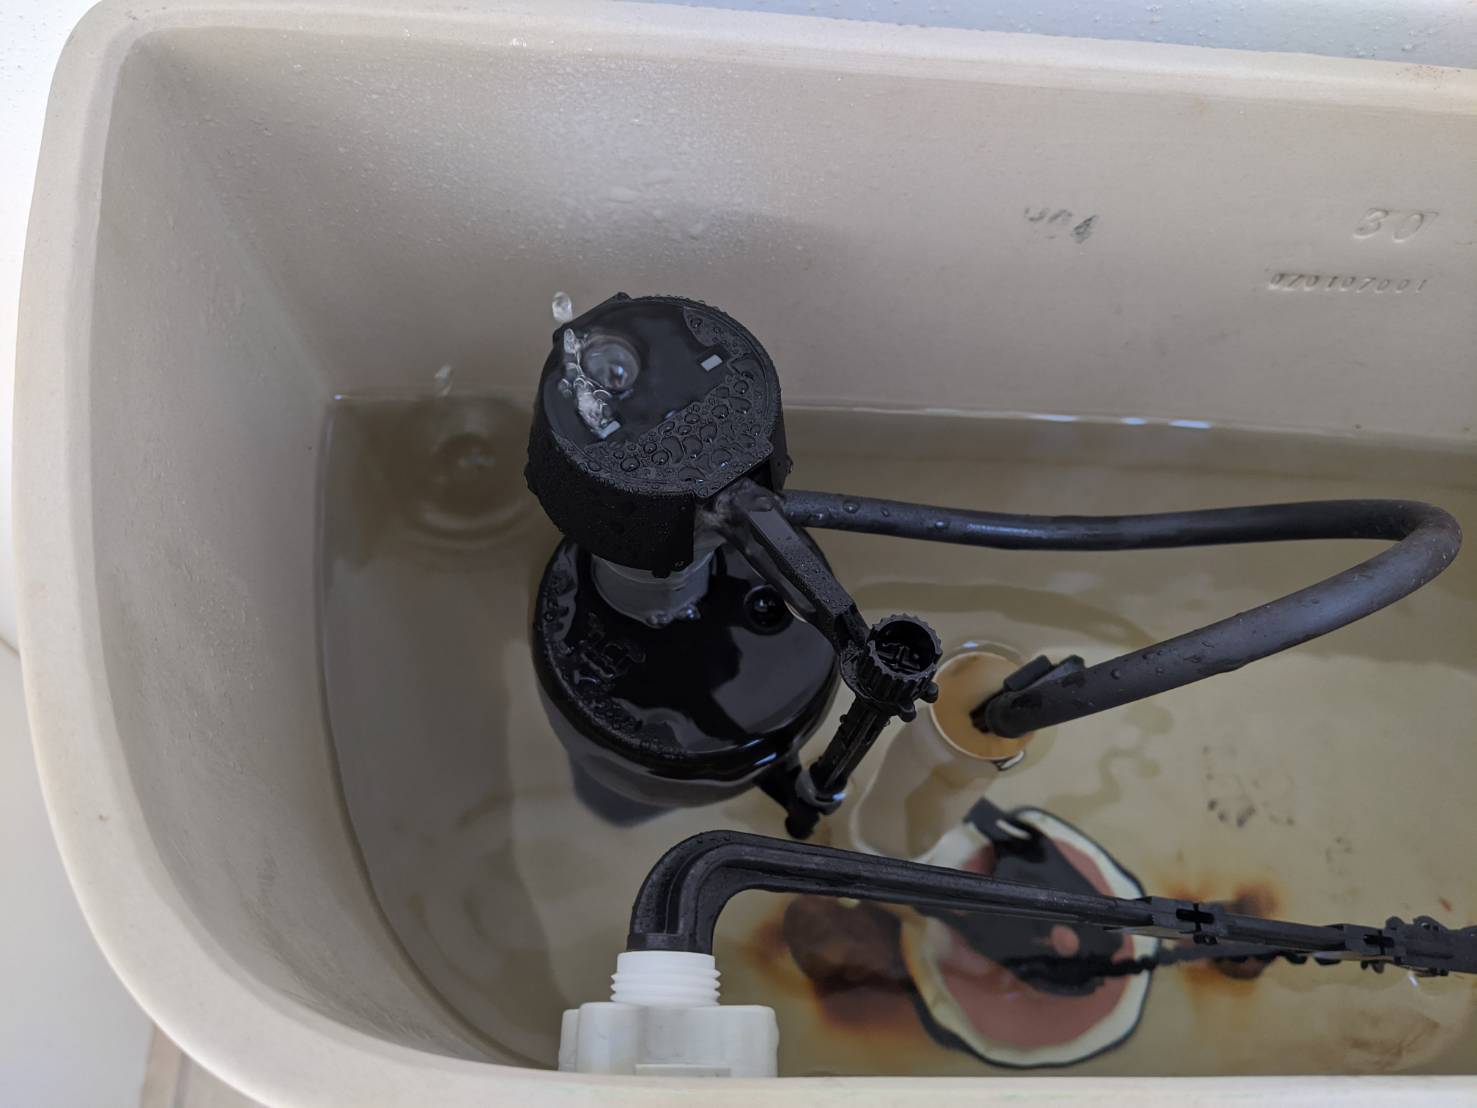
- Valve Cap: A threaded cap that secures the internal components and seals the top of the valve body. This is often where leaks originate.
- Overflow Tube: A vertical tube inside the tank that prevents the tank from overflowing into the bowl if the fill valve fails to shut off completely.
How It Works
- After a Flush: When you flush the toilet, the flapper at the bottom of the tank opens, allowing water to rush into the bowl and initiate the flush. As the water level in the tank drops, the float assembly lowers.
- Water Enters: The lowered float assembly signals the fill valve to open, allowing fresh water to enter the tank from the supply line.
- Refilling the Tank: Water flows into the tank, simultaneously refilling it and raising the float assembly.
- Shutting Off: As the water level rises, the float assembly moves upward. When it reaches a predetermined height (set by the manufacturer or adjusted by the homeowner), it triggers the shut-off mechanism inside the fill valve, stopping the water flow.
This continuous cycle ensures the tank is ready for the next flush while preventing overfilling.

Credit: www.youtube.com
Diagnosing A Leak From The Top Of The Fill Valve
A leak specifically from the *top* of the fill valve can be tricky to pinpoint initially. Unlike leaks from the base or the water supply connection, a top leak suggests an issue within the valve’s cap or the seal it creates.
Initial Inspection
The first step is to observe the toilet tank while it’s filling and when it’s full.
- Listen: Sometimes, you can hear a faint hissing or dripping sound coming from the top of the fill valve as the tank fills.
- Visual Check (While Filling): Carefully watch the fill valve as the tank refills. Is water visibly escaping from around the valve cap? This is the most direct indicator of a top leak. You might see a steady drip or a fine spray.
- Visual Check (When Full): Once the tank is full and the fill valve *should* be shut off, check again. If water is still trickling out from the top, it could indicate a faulty shut-off seal, but the *source* of the leak might still be the cap itself.
- Dry the Area: Use a dry cloth or paper towel to thoroughly dry the top of the fill valve, especially around the cap. Then, place a dry piece of paper towel or a small, dry rag around the cap. Wait for a few minutes (or until the tank refills if it’s empty) and check the paper towel/rag for moisture. This helps confirm the leak’s origin point.
Common Causes For Top Leaks
Several factors can cause water to escape from the top of the fill valve:
- Loose Valve Cap: The most straightforward cause. Over time, vibrations or minor disturbances can cause the threaded cap to loosen slightly. Even a small gap is enough for water to escape under pressure.
- Worn or Damaged Cap Seal: The rubber seal or gasket located between the valve body and the cap is crucial for creating a watertight seal. If this seal is old, brittle, cracked, or has debris on it, it won’t seal properly, allowing water to seep out.
- Cracked Valve Body: While less common, the plastic body of the fill valve itself could have a hairline crack near the top, especially if it’s old or has been subjected to freezing temperatures.
- Float Assembly Issues: If the float arm is misaligned or the connection point where the float assembly attaches to the valve body is compromised, it could potentially create stress or an opening that leads to a leak from the top.
- Over-tightening: Ironically, trying to tighten the cap too much can sometimes warp the plastic or damage the seal, leading to a leak.
Differentiating Top Leaks From Other Issues
It’s important not to confuse a leak from the top of the fill valve with other common toilet problems:
- Leak from the Water Supply Line: This will be evident at the connection point where the flexible hose meets the fill valve’s water inlet.
- Leak from the Fill Valve Base: This usually indicates a problem with the seal where the fill valve passes through the tank wall.
- Toilet Running Continuously (into the bowl): This is almost always a flapper issue or a faulty fill valve not shutting off completely, causing water to flow into the overflow tube. While a faulty fill valve *can* cause this, the leak point is typically at the overflow tube, not the top of the valve.
:max_bytes(150000):strip_icc()/fluidmaster-fill-valve-repair-2719029-05-5654b9e44b324dccb7a3d37126e01a33.jpg)
Credit: santacocktailclub.com
Troubleshooting And Repairing Top Leaks
Once you’ve confirmed the leak originates from the top of the fill valve, you can proceed with targeted troubleshooting steps.
Step 1: Tighten The Valve Cap
This is the easiest fix and should always be the first attempt.
- Ensure Water is Off: Turn off the water supply to the toilet by closing the shut-off valve located on the wall behind the toilet. Flush the toilet to empty the tank.
- Gently Tighten: Locate the threaded cap on top of the fill valve. With your hand, try to gently tighten it clockwise. Do not use excessive force, as you could crack the plastic.
- Turn Water Back On: Slowly open the shut-off valve. Let the tank refill.
- Observe: Check if the leak has stopped. If it has, congratulations! You’ve solved the problem. If the leak persists, proceed to the next step.
Step 2: Inspect And Clean The Valve Cap And Seal
If tightening didn’t work, the issue is likely with the seal or debris.
- Turn Water Off & Empty Tank: As before, turn off the water supply and flush the toilet to empty the tank.
- Remove the Valve Cap: Unscrew the cap counter-clockwise. You might need to apply gentle pressure. Some caps have locking tabs; check your specific model.
- Inspect the Seal: Carefully examine the rubber seal or gasket that sits inside the cap or on the valve body. Look for:
- Cracks or Tears: Any visible damage means the seal needs replacement.
- Debris: Small particles of sediment, mineral deposits, or old rubber can prevent a proper seal.
- Deformation: Is the seal flattened or misshapen?
- Clean: If the seal looks intact but dirty, clean it gently with a damp cloth. Also, clean the mating surface on the valve body where the seal sits. Use a soft brush or cloth to remove any mineral buildup.
- Reassemble: Place the seal back correctly (if removed) and screw the cap back on firmly but not excessively tight.
- Test: Turn the water back on and check for leaks.
Step 3: Replace The Cap Seal
If the seal is damaged or worn, it needs replacement.
- Identify Valve Type: Note the brand and model of your fill valve. This is crucial for purchasing the correct replacement seal. Universal seals are often available.
- Purchase Replacement Seal: Take the old seal (or a clear photo and model number) to a hardware or plumbing supply store to find an exact match.
- Turn Water Off & Empty Tank: Ensure the water supply is off and the tank is empty.
- Remove Cap and Old Seal: Unscrew the cap and carefully pry out the old, damaged seal.
- Install New Seal: Fit the new seal into its designated spot in the cap or valve body. Ensure it’s seated correctly and flush.
- Reassemble and Test: Screw the cap back on, turn the water supply on, and check for leaks.
Step 4: Adjust The Float Assembly
While less common for *top* leaks, an improperly set float can sometimes contribute. If the water level is set too high, it can put extra pressure on the cap seal or cause water to constantly churn near the top.
- Turn Water Off & Empty Tank: As usual, turn off the water and empty the tank.
- Locate Float Adjustment:
- Float Cup: Most modern fill valves have a float cup that moves up and down the valve body. There’s usually a clip or screw mechanism to adjust its height. Lowering the float cup will result in a lower water level in the tank.
- Float Ball: Older models use a float ball on an arm. You can often bend the metal arm slightly downward to lower the water level, or adjust a screw at the pivot point.
- Adjust: Make small adjustments to lower the float’s resting position. Aim for the water level to be about 1/2 to 1 inch below the top of the overflow tube.
- Reassemble and Test: Reassemble the cap, turn the water on, and let the tank refill. Check the water level and observe for leaks.
Step 5: Consider Valve Body Crack
If all else fails, and you’ve confirmed the leak is from the top and not a seal issue, the valve body itself might be cracked.
- Visual Inspection: With the cap removed, carefully inspect the plastic valve body for any signs of cracks, especially around the top rim where the cap screws on.
- Replacement is Necessary: If a crack is found, the entire fill valve needs to be replaced. This is not a repairable issue.
Credit: aspireyouthandfamily.com
Replacing The Entire Fill Valve
If troubleshooting doesn’t solve the leak, or if you discover a cracked valve body, replacing the entire fill valve is the most reliable solution. Modern universal fill valves are designed to fit most toilets and are relatively inexpensive.
Choosing A Replacement Valve
- Universal Fit: Most readily available fill valves are universal and come with instructions to adapt them to various toilet tank sizes and types.
- Brand Reputation: Stick with reputable brands like Fluidmaster, Korky, or Kohler for quality and durability.
- Features: Some valves offer quick-install features or adjustable height settings.
Step-by-step Replacement Process
- Turn Off Water: Close the shut-off valve behind the toilet.
- Empty Tank: Flush the toilet and hold down the handle to drain as much water as possible. You may need a sponge or towel to remove the remaining water.
- Disconnect Water Supply Line: Use an adjustable wrench to disconnect the water supply line from the bottom of the fill valve. Have a towel ready to catch any residual water.
- Remove Old Fill Valve:
- Unlock Cap: Unscrew the valve cap.
- Loosen Lock Nut: Locate the large plastic lock nut on the underside of the tank, where the fill valve passes through. Unscrew this nut counter-clockwise. You might need a tool like a large pair of pliers or a specific tank wrench, but often hand strength is sufficient.
- Lift Out: Once the lock nut is removed, lift the old fill valve straight up and out of the tank.
- Clean Tank Opening: Clean the area around the hole in the tank where the fill valve was seated.
- Install New Fill Valve:
- Position: Insert the new fill valve into the hole from inside the tank. Ensure it’s centered and the overflow tube (if attached) is correctly positioned.
- Attach Lock Nut: From underneath the tank, screw the new lock nut onto the fill valve’s threaded shank. Tighten it securely by hand, then give it a final quarter-turn with a wrench or pliers if needed. Do not overtighten, as this can crack the tank.
- Connect Water Supply: Attach the water supply line to the new fill valve’s inlet. Tighten securely with a wrench.
- Adjust Float: Adjust the float height according to the manufacturer’s instructions to set the correct water level (typically 1/2 to 1 inch below the overflow tube.
- Turn Water On and Test: Slowly open the shut-off valve. Check the connection at the supply line for leaks. Let the tank refill and check the fill valve itself for any leaks, especially from the top. Flush the toilet to ensure it operates correctly and shuts off at the right level.
Example: Replacing A Fluidmaster Fill Valve
Fluidmaster is a popular brand, and their universal fill valves are common. The process generally involves removing the cap, loosening the large nut underneath the tank, lifting out the old valve, inserting the new one, tightening the nut, and reconnecting the supply line.
Always refer to the specific instructions included with your new valve, as designs can vary slightly.
Preventative Maintenance For Your Toilet
Preventing problems before they start is always the best approach. Regular maintenance can extend the life of your toilet’s components and avoid issues like fill valve leaks.
Regular Inspections
- Listen for Running Water: Make it a habit to listen for any sounds of running water when the toilet isn’t in use. This is often the first sign of a leak.
- Check Water Level: Periodically check the water level in the tank. If it’s consistently too high or too low, it could indicate an issue with the fill valve or float.
- Examine Components: Every few months, lift the tank lid and visually inspect the fill valve, float, flapper, and chain for any signs of wear, corrosion, or mineral buildup.
Dealing With Hard Water
Hard water, which contains high levels of minerals like calcium and magnesium, can significantly impact plumbing components.
- Mineral Buildup: Minerals can accumulate on seals, float mechanisms, and inside the valve body, leading to friction, improper sealing, and eventual leaks.
- Cleaning: If you have hard water, you may need to clean the fill valve components more frequently. A solution of vinegar and water can help dissolve mineral deposits. Caution: Avoid using harsh chemicals or abrasive cleaners that could damage plastic or rubber parts.
- Water Softener: Installing a whole-house water softener can mitigate the long-term effects of hard water on all your plumbing fixtures.
Replacing Worn Parts
- Flapper: The flapper is a common culprit for running toilets and typically needs replacement every 2-5 years, depending on water quality and usage. A worn flapper can cause the fill valve to run intermittently.
- Seals: Even if not leaking, rubber seals and gaskets degrade over time. Consider replacing the fill valve cap seal proactively if your toilet is over ten years old.
When To Call A Professional Plumber
While most fill valve leaks are DIY-friendly repairs, there are times when calling a professional is the wisest course of action.
- Uncertainty: If you’re uncomfortable diagnosing the problem or performing the repair, a plumber has the expertise and tools to do it quickly and correctly.
- Persistent Leaks: If you’ve tried the troubleshooting steps and the leak persists, a professional can identify more complex issues.
- Damage to Tank: If you suspect the toilet tank itself is cracked or damaged, a plumber can assess the situation and advise on replacement.
- Water Damage: If a leak has already caused significant water damage to your floor or surrounding areas, a plumber can address the plumbing issue, and you may need to consult a water damage restoration specialist.
- Lack of Tools/Time: If you don’t have the necessary tools or the time to perform the repair yourself, hiring a plumber is a practical solution.
A plumber’s visit typically costs between $100-$250 for a simple repair like a fill valve replacement, depending on your location and the complexity of the job. While this is more expensive than a DIY fix, it guarantees the job is done right and can prevent further damage.
Common Fill Valve Issues Vs. Top Leaks
| Issue | Primary Symptom | Likely Cause | Fix |
|---|---|---|---|
| **Top Leak** | Water seeping from the **fill valve cap** area. | Loose cap, worn cap seal, cracked valve body. | Tighten cap, replace seal, replace valve. |
| **Running Toilet** | Water constantly flows into the overflow tube. | Worn flapper, fill valve not shutting off completely. | Replace flapper, adjust/replace fill valve. |
| **Low Water Level** | Tank doesn’t fill sufficiently for a good flush. | Float set too low, worn float seal, valve not opening fully. | Adjust float, replace seal, replace valve. |
| **Overfilling Tank** | Water flows into overflow tube due to shut-off. | Float set too high, fill valve mechanism failure. | Adjust float, replace fill valve. |
| **Supply Line Leak** | Water at the connection to the fill valve. | Loose connection, worn supply line washer, damaged supply line. | Tighten connection, replace washer, replace supply line. |
| **Base Leak** | Water around the fill valve shank inside tank. | Loose lock nut, worn tank-to-valve seal. | Tighten lock nut, replace seal/valve. |
Frequently Asked Questions
Why Is Water Leaking From The Very Top Of My Fill Valve, Even When The Tank Is Full?
This typically indicates that the seal between the valve cap and the main valve body has failed or is compromised. It could be due to a worn-out rubber gasket, debris caught in the seal, or the cap itself being slightly loose. Even though the main shut-off mechanism might be working, the seal at the cap isn’t holding, allowing water under pressure to escape from the top.
Can I Just Ignore A Small Leak From The Top Of The Fill Valve?
No, it’s not advisable to ignore even a small leak. A continuous drip from the fill valve, regardless of its location, leads to water waste, which increases your utility bills and is environmentally irresponsible. Furthermore, a leak from the top can be an early warning sign of a more significant failure, and the constant moisture can potentially lead to corrosion or mold growth in the long run. Addressing it promptly is always the best approach.
How Often Should I Expect To Replace My Toilet Fill Valve?
The lifespan of a toilet fill valve can vary significantly depending on water quality (especially hardness), usage frequency, and the quality of the valve itself. However, a typical fill valve can last anywhere from 5 to 15 years. If your toilet is experiencing frequent issues with filling or shutting off, or if you notice leaks, it might be nearing the end of its service life.
Is It Possible To Overtighten The Fill Valve Cap And Cause A Leak?
Yes, it is absolutely possible to overtighten the fill valve cap. These caps are usually made of plastic and are designed to be hand-tightened. Overtightening can warp the cap, damage the threads on the valve body, or crush the rubber seal, all of which can lead to leaks.
Always tighten