
Is your beautiful veneer table showing its age? Don’t worry, those nicks, scratches, or peeling edges don’t mean you have to say goodbye to your favorite piece of furniture.
You can bring that tabletop back to life yourself! This guide will walk you through, step-by-step, how to repair a veneer table top. Get ready to impress yourself with how easy it can be to restore its gorgeous finish.
Identify The Veneer Damage
First, find the problem. Look closely at your table. What is wrong with the wood veneer? Knowing the damage helps fix it. This step is very important. It guides your repair work. See the different types of damage.
Scratches And Dings
Surface scratches are common. They look like thin lines. Dings are small dents. They are often shallow. These marks mar the table’s look. They can be minor issues.
Chips And Gouges
Chips are missing pieces. A chunk of veneer is gone. Gouges are deep cuts. They go into the wood. These are more serious problems. They need careful repair.
Lifting Or Peeling Veneer
Veneer can come loose. It starts to lift up. Edges may peel away. This happens over time. Moisture can cause this. Heat also plays a role.
Water Stains And Discoloration
Water leaves marks. These are often white rings. Dark stains mean deeper damage. Discoloration changes the color. Sunlight can fade the wood. These affect the table’s finish.
Gather Your Repair Supplies
Gather necessary items. You’ll need glue and a clamp. Sandpaper is also important.
Repairing a veneer tabletop is achievable. You need the right tools. Gathering these supplies makes the job smooth. Prepare your workspace. Having everything ready saves time. It prevents interruptions.Cleaning Agents
First, clean the area. Use a mild soap. Water works well too. A soft cloth is essential. Remove all dirt and grime. This prepares the surface. It ensures good adhesion.Wood Filler Or Putty
You might have chips. Small holes need filling. Wood filler is the answer. Choose a color match. Putty works for larger gaps. It restores the tabletop’s surface.Adhesive For Veneer
Loose veneer needs fixing. A strong wood glue is best. Special veneer glue is ideal. It bonds the veneer securely. Apply it thinly. Press it down firmly.Clamps Or Weights
Pressure is crucial. Clamps hold the veneer. Weights can also work. They keep the veneer flat. This ensures a strong bond. Let the glue dry completely.Sandpaper (various Grits)
Sanding smooths the repair. Start with coarse grit. Move to finer grits. This makes the surface even. It removes excess glue. It prepares for finishing.Touch-up Markers Or Stain
Color matching is important. Use touch-up markers. They fill in small scratches. Wood stain can also work. Blend the color carefully. It hides the repair area.Clear Finish
Protect your hard work. A clear finish seals the top. Polyurethane is a good choice. It adds durability. It restores the shine. Apply it evenly.Repairing Minor Scratches
Small scratches on veneer tabletops are fixable. A simple repair kit can often hide them. Your table can look great again.
Repairing minor scratches on your veneer table top is surprisingly simple. These small nicks happen. Don’t worry. You can fix them. This section guides you. You will learn easy steps. Your table will look new again.Cleaning The Surface
First, clean the scratched area. Dust and dirt hide scratches. Use a soft, damp cloth. Wipe gently. Do not soak the veneer. Let the surface dry completely. A clean surface is crucial. This prepares it for repair.Buffing With A Soft Cloth
Sometimes, light buffing helps. Use a dry, soft cloth. Rub the scratch in a circular motion. This may remove minor scuffs. It can also blend the scratch. Work gently. You are not polishing aggressively. You are just buffing.Using A Touch-up Marker
For deeper scratches, use a marker. Get a veneer repair marker. Choose a color that matches your table. Test it on an inconspicuous spot first. Apply the marker carefully. Fill the scratch with color. Wipe away excess marker immediately. Let it dry. The scratch should now be less visible. Your table is looking better.Fixing Deeper Scratches And Dings
Deeper scratches need more care. You can fill them with wood filler. Sand it smooth after it dries.
Deeper marks need more work. Small scratches are easy. Big ones need a careful touch. Do not worry. You can fix them.Gentle Sanding
Start with fine sandpaper. Use 220-grit paper. Sand the scratch area lightly. Go with the wood grain. This smooths the edges. It preps the surface. Remove dust with a cloth.Applying Wood Filler
Choose a matching wood filler. Get a color close to your table. Use a putty knife. Apply filler to the scratch. Press it in firmly. Fill the entire damaged area. Scrape off excess filler. Make it level with the surface.Drying And Smoothing
Let the filler dry completely. Check the product instructions. Drying time varies. Once dry, sand again. Use fine-grit sandpaper. Smooth the filled area. Blend it with the table. Wipe away all dust. Your table is almost new.Addressing Chips And Gouges
Fix chips and gouges on your veneer table. Repairing these marks is simple. Restore your table’s beauty with easy steps.
Chips and gouges mar your veneer tabletop. These imperfections steal its beauty. Repairing them is possible. You can restore its smooth finish. This section guides you. We will fix those damaged spots.Cleaning The Area
First, clean the damaged spot. Remove all loose debris. Use a soft, dry cloth. Gentle cleaning is key. This ensures good adhesion. You want a clean surface.Filling With Wood Putty
Next, apply wood putty. Choose a putty color. Match it to your table’s finish. Use a small putty knife. Press the putty firmly into the chip. Fill the area completely. Don’t overfill.Leveling And Drying
Smooth the excess putty. Make it level with the surface. Use the putty knife carefully. Let the putty dry fully. Drying times vary. Check the putty’s instructions. Patience is important here.Sanding To Match
Once dry, it’s time to sand. Use fine-grit sandpaper. Sand gently. Feather the edges. Blend the repaired area. You want it smooth. Match the surrounding finish.Reattaching Lifting Veneer
Loose veneer on your table? Reattaching lifting veneer is a key repair. This process secures the decorative wood layer. It restores your tabletop’s smooth finish.
A common veneer problem is lifting. The thin wood layer separates from the base. This can happen from moisture or age. Repairing this is often straightforward. You can reattach loose veneer yourself. This section guides you through the process. It restores your table’s smooth surface.Carefully Lifting The Veneer
Gently lift the loose veneer edge. Use a thin, flexible tool. A putty knife works well. Be very careful. Do not tear the veneer. Work slowly and patiently. You need to expose the underlying wood. This area will receive glue.Applying Wood Glue
Use a good quality wood glue. A syringe applicator is helpful. It allows precise glue application. Squeeze glue under the veneer. Ensure even coverage. Reach as far as possible. The glue must contact both surfaces.Securing With Clamps
Press the veneer down firmly. Use a damp cloth to wipe. This removes excess glue. Now, secure the veneer. Use clamps or heavy objects. Protect the veneer surface. Place a thin piece of wood. Lay it over the glued area. Then apply the clamp. A heavy book can work. Ensure even pressure is applied.Removing Excess Glue
Wipe away any squeezed-out glue. Use a damp cloth immediately. Dried glue is hard to remove. Cleanliness is important here. A tidy repair looks better. It also prevents sticking.Allowing To Cure
Leave the clamps in place. Follow the glue manufacturer’s instructions. Most glues need hours to dry. Some require a full day. Do not disturb the repair. Let the glue fully harden. This ensures a strong bond. Your veneer will be secure.Dealing With Water Stains
Water stains mar your beautiful veneer tabletop. Don’t despair. Many stains are fixable. You can restore its shine. This section guides you. We tackle those pesky water rings.
Mild Cleaning Solutions
Start with gentle methods. They often work best. Try a damp cloth first. Wipe the stained area. Use a soft, clean cloth. Rub gently. Sometimes this is enough. You can also use mild soap. Mix a little dish soap. Add it to water. Dip your cloth. Wring it out well. Wipe the stain again. Dry the area thoroughly. Use a dry, soft cloth. This prevents new marks.
Iron And Cloth Method
Stubborn stains need more. The iron trick can help. Get a clean, dry cloth. Lay it over the stain. Set your iron low. No steam is needed. Press the warm iron. Hover it over the cloth. Do not leave it still. Move the iron constantly. The heat draws out moisture. Lift the cloth to check. Repeat if necessary. Be patient. This method lifts white rings.
Sanding And Refinishing
Deep stains require effort. Sanding is the next step. Use fine-grit sandpaper. Sand only the stained spot. Go with the wood grain. Sand lightly at first. Check your progress often. You want to remove the stain. Avoid sanding too deep. This can go through veneer. After sanding, clean the dust. Wipe it with a tack cloth. Now, refinish the spot. Use a matching wood stain. Apply a clear topcoat. Let it dry completely. Your table will look new.
:max_bytes(150000):strip_icc()/veneertops1-7f900fbfb9184c1fbe977f56ab446254.jpg)
Credit: www.woodmagazine.com
Color Matching And Finishing
Matching the wood’s color is key. A good finish protects the repair. This makes your table look like new again.
Getting the color right is key. A perfect match makes repairs disappear. Finishing protects your work. It brings back the table’s beauty. This section guides you.Using Touch-up Pens
Small scratches need simple fixes. Touch-up pens are great. They come in many wood colors. Pick a shade close to your table. Test it on an unseen spot first. Gently apply the pen to the scratch. Let it dry completely. Wipe away any excess. It’s an easy solution.Staining To Match
Deeper damage needs stain. You might need to mix stains. Get small sample pots. Test colors on scrap wood. Aim for an exact match. Apply stain carefully to the damaged area. Use a small brush. Build color slowly. Let each coat dry. This takes patience.Applying A Protective Topcoat
Protection is vital. A topcoat seals the repair. It also protects the whole surface. Use a clear finish. Polyurethane or lacquer works well. Apply thin, even coats. Follow the product instructions. Allow adequate drying time. Multiple coats add durability.Buffing For Shine
The final step is shine. After the topcoat cures, buff. Use a soft, clean cloth. Rub in a circular motion. This brings out a beautiful sheen. It makes the table look new. Your repair will blend in. Enjoy your restored table.Preventing Future Damage
Protect your repaired veneer table. Regular dusting prevents scratches. Use coasters under drinks always. Avoid direct sunlight exposure. This keeps your table looking new.
Preventing future damage is crucial. It keeps your table looking its best. Simple steps make a big difference. Protect your investment.Using Coasters And Placemats
Always use coasters. They stop drink rings. Rings damage veneer. Use placemats for meals. Placemats shield the surface. They prevent scratches. Protect your table always.Avoiding Direct Sunlight
Keep your table away from windows. Direct sun fades veneer. Sun can also dry it out. This causes cracks. Find a shadier spot. Protect it from the sun.Regular Cleaning And Maintenance
Clean your table often. Use a soft, damp cloth. Wipe up spills right away. Do not use harsh cleaners. They can strip the finish. A little care goes far. Keep it clean.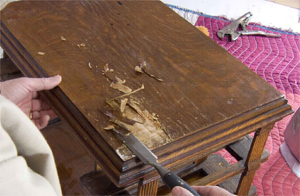
Credit: www.wwgoa.com

Credit: www.youtube.com
Frequently Asked Questions
What Is Veneer Table Repair?
Veneer repair fixes damaged thin wood layers on furniture. It restores your table’s beauty and protects it.
How To Fix Peeling Veneer?
Gently lift the peeling edge. Apply wood glue underneath with a thin tool. Press it down firmly.
Can I Fix Veneer Scratches?
Yes, small scratches can be buffed out. Use fine-grit sandpaper or a matching crayon. For deeper scratches, you might need filler.
What Glue To Use For Veneer?
Use a good quality wood glue. This glue holds the veneer securely. It dries clear for a neat finish.
How To Reattach Loose Veneer?
Carefully apply wood glue to the underside. Use a clamp or heavy book to hold it. Let it dry completely.
Can I Repair Water Damaged Veneer?
Water damage can be tricky. Try to dry it quickly. If it’s warped, you might need to replace the section.
When To Call A Professional For Veneer?
Large or complex damage needs an expert. If the veneer is severely cracked or missing. A pro can ensure a perfect match.
Conclusion
Your veneer table is now beautiful again. You can fix scratches yourself. Sanding and refinishing work well. A little care brings back its shine. Enjoy your revitalized furniture. It’s a rewarding project.