
Have you noticed tiny spider cracks creeping across your fiberglass boat’s surface? These small cracks might seem harmless at first, but if left untreated, they can lead to bigger problems that could cost you time and money.
You don’t have to be an expert to fix them. You’ll discover simple, effective steps to repair those spider cracks and keep your boat looking great and seaworthy. Keep reading, and you’ll learn how to protect your investment and enjoy smooth sailing for years to come.
Identifying Spider Cracks
Identifying spider cracks in a fiberglass boat is important for safe and smooth sailing. These cracks can weaken the boat’s structure over time. Early detection helps stop the damage from getting worse. Knowing what causes these cracks and spotting their signs can save money and effort on repairs.
Common Causes
Spider cracks usually form from stress and impact on the boat’s surface. Sun exposure weakens the fiberglass and makes it brittle. Water damage can also cause the material to crack. Sudden impacts, like hitting rocks or docks, create small fractures. Poor manufacturing or old age can make cracks appear more easily.
Signs To Look For
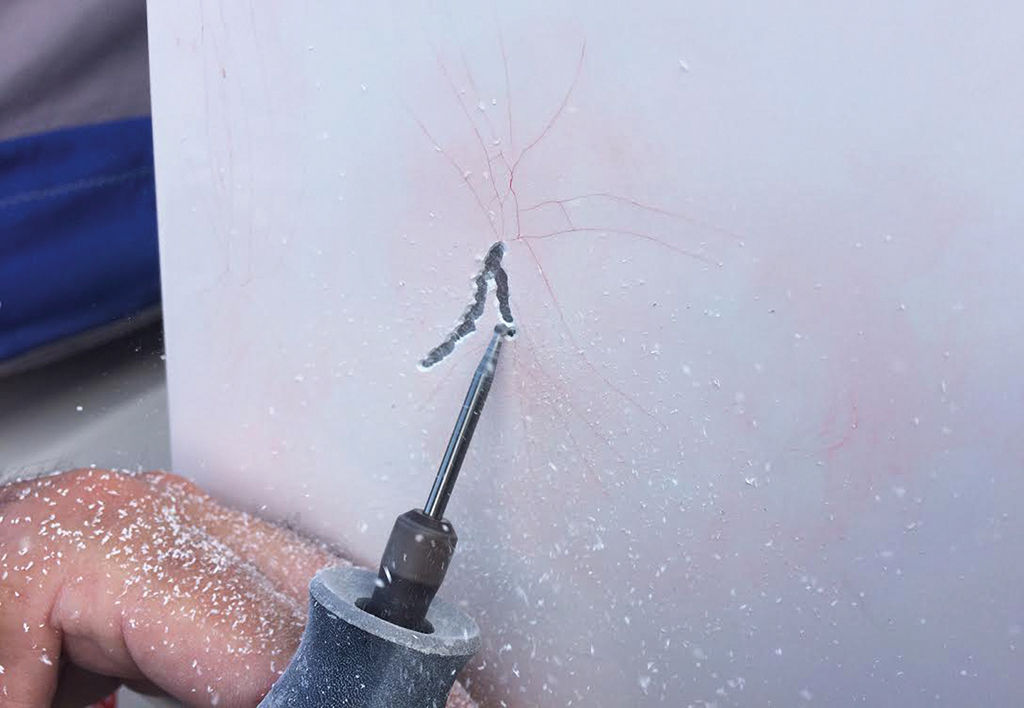
Spider cracks look like small, thin lines spreading out from a center point. They often appear on the gel coat, the shiny outer layer of the boat. These cracks may look like spider webs or tiny branches. The cracks do not go deep but show damage to the surface. Check your boat regularly, especially after rough use or storms.
Gathering Repair Materials
Before fixing spider cracks in your fiberglass boat, gather the right materials. Having the correct tools and supplies makes the repair easier. It also helps you get a smooth, lasting finish. Preparing your workspace and materials will save time and reduce mistakes.
Essential Tools
- Sanding block or electric sander for smoothing surfaces
- Utility knife or razor blade to remove loose fibers
- Mixing containers for resin and hardener
- Putty knife or spreader to apply filler and resin
- Protective gloves and mask for safety
- Paintbrush for applying resin evenly
- Drill with small wire brush attachment (optional for cleaning)
Recommended Supplies
- Fiberglass repair kit with resin and hardener
- Fiberglass cloth or mat for reinforcement
- Marine-grade filler or epoxy putty to fill cracks
- Acetone or cleaning solvent to prep the surface
- Sandpaper in various grits (80, 150, 220) for smooth finish
- Masking tape to protect areas around the crack
- Wax remover to clean the surface before repair
Preparing The Damaged Area
Preparing the damaged area is the first step to fix spider cracks in your fiberglass boat. A clean and smooth surface helps the repair materials stick better. This step improves the strength and appearance of the repair. Take your time to do it well. It makes the next steps easier and more effective.
Cleaning Techniques
Start by washing the cracked area with fresh water. Use a mild soap to remove dirt and grease. Rinse thoroughly and let it dry completely. Avoid harsh chemicals that can damage the fiberglass. Use a soft brush or cloth to scrub gently. This removes loose particles and prepares the surface for sanding.
Sanding Tips
Use medium-grit sandpaper, around 120 to 150 grit. Sand the cracked area and a little beyond it. Make sure to smooth out the edges of the cracks. Sand in a circular motion to avoid deep scratches. Wipe away dust with a clean cloth. Proper sanding helps the repair resin bond well and creates a smooth finish.

Credit: www.youtube.com
Applying Resin And Filler
Applying resin and filler is a key step in fixing spider cracks on a fiberglass boat. This process seals the cracks and restores the boat’s smooth surface. Proper application helps prevent further damage and keeps water from seeping in.
Choosing the right resin and filler is important. These materials bond well with fiberglass and create a strong patch. Careful preparation and application ensure the repair lasts longer and looks neat.
Mixing Resin Properly
Mix the resin and hardener in the exact ratio recommended on the package. Use a clean container and a stir stick to blend them well. Stir slowly to avoid air bubbles that weaken the mix.
Mix only the amount you can use within the working time. Resin hardens fast, so prepare small batches. Proper mixing ensures the resin cures evenly and sticks firmly to the cracks.
Filling The Cracks
Use a small brush or applicator to apply the mixed resin into the spider cracks. Press the resin deep into the cracks to fill every gap. Avoid spreading resin outside the cracked area.
Once the resin sets, apply a suitable filler to smooth the surface. Spread the filler evenly and let it dry completely. Sand the area gently to blend the repair with the boat’s surface.
Sanding And Smoothing
Sanding and smoothing are crucial steps in fixing spider cracks in your fiberglass boat. This process removes rough edges and prepares the surface for repair. Proper sanding ensures the crack area blends well with the rest of the boat. It also helps the repair materials stick better and last longer.
Take your time during sanding. Rushing can cause more damage or leave the surface uneven. The goal is to create a smooth, clean area ready for patching and painting.
Choosing The Right Grit
Select sandpaper grit carefully for the best results. Start with a coarse grit like 80 or 100 to remove damaged material quickly. Use firm but gentle pressure to avoid making deep scratches.
After the rough sanding, switch to medium grit like 180 or 220 to smooth the edges. This step reduces the roughness from the coarse grit.
Finish with fine grit sandpaper, around 320 to 400, to create a smooth surface. This final sanding helps the repair blend seamlessly with the boat’s finish.
Achieving A Seamless Finish
Work in small, circular motions to avoid visible lines. Keep the sandpaper wet or use sanding blocks for even pressure.
Check the surface often under good light. Feel with your hand for any bumps or rough spots.
Use a clean cloth to wipe away dust regularly. This prevents buildup that can affect the smoothness.
Take breaks to inspect your work. Sanding a little more may be needed to perfect the finish before applying repair materials.
Painting And Sealing
Painting and sealing are essential steps to protect your fiberglass boat after fixing spider cracks. These steps help stop water from entering and prevent further damage. A good paint job also improves the boat’s look and durability.
Selecting Marine Paint
Choose paint made specifically for marine use. Marine paint resists salt, sun, and water better than regular paint. Look for products that offer strong adhesion and flexibility. These qualities help the paint hold up on fiberglass surfaces. Pick a color that matches your boat’s original shade for a seamless repair. Make sure the paint is easy to apply and dries quickly.
Applying Protective Coating
Apply a protective coating after the paint has dried. This coating seals the paint and adds extra protection. Use a clear marine varnish or sealant designed for boats. Apply thin, even layers with a clean brush or spray. Let each layer dry fully before adding another. This process creates a tough barrier against sun, water, and scratches. It keeps your repair strong and the boat looking great.
Preventing Future Cracks
Preventing future spider cracks on your fiberglass boat keeps it safe and strong. These cracks often start small but can grow if not managed well. Taking care now saves time and money later. Good habits and simple checks help stop cracks from forming again.
Regular Maintenance Tips
Check your boat’s surface often for any signs of cracks. Clean it regularly to remove dirt and salt. Use mild soap and water to avoid damage. Apply wax every few months to protect the gel coat. Keep the boat covered when not in use to shield from sun and rain. Inspect the hull after rough waters or impacts. Fix small chips or scratches quickly to stop cracks from spreading.
Avoiding Common Mistakes
Do not overload your boat beyond the recommended weight. Avoid sharp impacts or dragging the boat on hard surfaces. Use proper lifting techniques to prevent stress on the hull. Do not use harsh chemicals or abrasive tools when cleaning. Avoid parking the boat under trees to prevent sap and debris buildup. Keep water out of cracks by sealing them properly. These simple steps reduce the chance of new spider cracks forming.
Credit: powerandmotoryacht.com

Credit: www.reddit.com
Frequently Asked Questions
What Causes Spider Cracks In Fiberglass Boats?
Spider cracks often result from sun damage, age, or stress on the fiberglass surface. Small impacts and temperature changes also cause these cracks.
How Can I Identify Spider Cracks On My Boat?
Spider cracks look like tiny, thin lines forming web-like patterns on the fiberglass. They are usually shallow and spread across the surface.
Are Spider Cracks Dangerous For Fiberglass Boats?
Spider cracks are mostly cosmetic but can let water in if they worsen. Early repairs stop bigger problems like delamination or leaks.
What Materials Do I Need To Fix Spider Cracks?
You will need sandpaper, fiberglass resin, hardener, a putty knife, and marine paint or gel coat. Safety gear like gloves and masks is also important.
Can I Repair Spider Cracks Myself At Home?
Yes, simple spider cracks can be fixed at home with proper tools and patience. Follow step-by-step guides to get good results.
How Do I Prepare The Boat Surface Before Fixing Cracks?
Clean the area thoroughly and sand the cracks lightly to remove loose material. This helps the resin stick better to the fiberglass.
What Type Of Resin Works Best For Spider Crack Repairs?
Marine-grade polyester or epoxy resin works best for repairing spider cracks. These resins bond well and resist water damage.
How Long Does It Take For Resin To Dry After Repair?
Resin usually takes 24 hours to fully cure, depending on temperature and humidity. Avoid touching or painting it before it dries.
Should I Repaint The Boat After Fixing Spider Cracks?
Yes, repainting or applying gel coat protects the repaired area and blends it with the rest of the boat. It also improves appearance.
How Can I Prevent Spider Cracks From Returning?
Keep your boat covered when not in use and apply UV protectant regularly. Avoid heavy impacts and perform routine inspections for damage.
Conclusion
Spider cracks can weaken your fiberglass boat over time. Fixing them early helps keep your boat strong and safe. Use the right tools and follow clear steps for best results. Small cracks are easier to repair than big ones. Regular checks prevent damage from getting worse.
Take care of your boat to enjoy many trips on the water. Repairing spider cracks is simple with patience and care. Keep your boat looking good and lasting longer with these tips.