
A leaking pipe behind a tiled wall can quickly turn from a small drip into a costly mess. You might not even realize the damage until it’s too late.
But don’t worry—you don’t have to call a plumber right away or tear down your entire wall. In this guide, you’ll learn simple, step-by-step ways to locate and fix that hidden leak. By taking action now, you’ll save money, prevent further damage, and protect your home.
Keep reading to discover how easy it can be to stop that leak before it causes serious trouble.
Signs Of A Leak Behind Tiles
Leaks behind tiled walls can cause serious damage if not found early. Tiles hide the problem, so signs are often subtle. Watch for changes in your tiles and walls. Early detection saves money and prevents mold growth.
Check your bathroom or kitchen walls regularly. Notice anything unusual. Below are key signs that point to a leak behind tiles.
Visible Water Damage
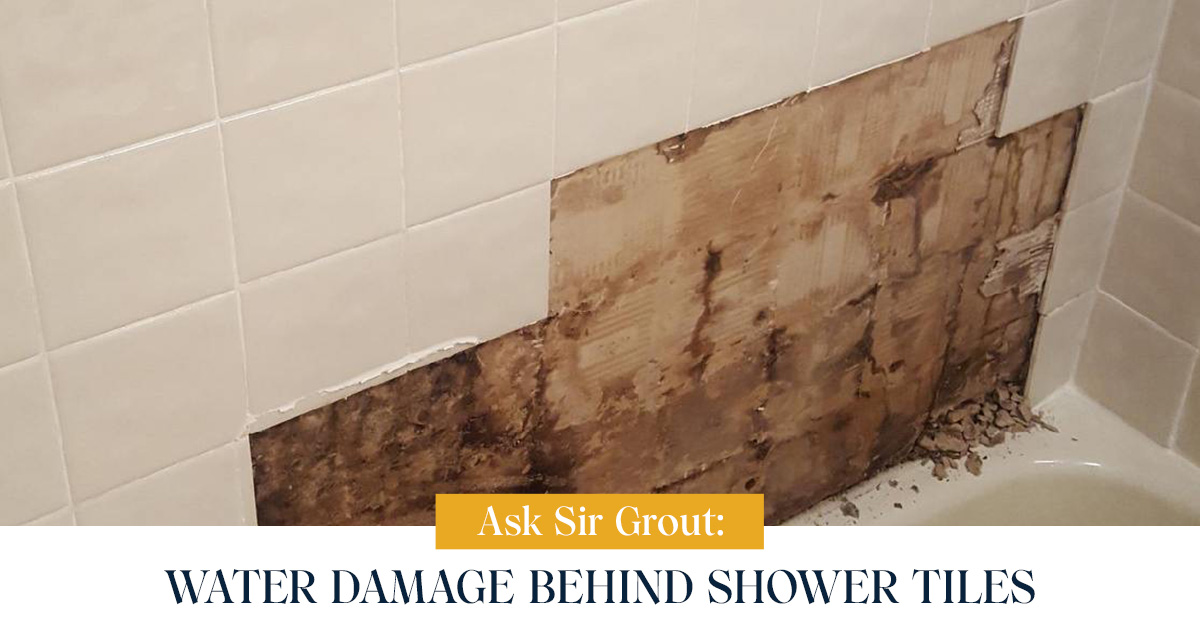
Look for discoloration or stains on grout or tiles. Water stains often appear as dark or yellow spots. These spots may spread over time. Peeling paint near tiles is also a red flag. Water can seep through and weaken wall surfaces.
Mold And Mildew Growth
Mold grows well in damp places behind tiles. You might see black, green, or white patches. Mold can cause health problems and damage the wall. Check corners and edges where moisture hides. A small patch could mean a bigger problem behind the tiles.
Musty Odors
A strong, damp smell often means hidden leaks. Musty odors come from mold and mildew. They linger even after cleaning. If your bathroom or kitchen smells odd, investigate the source. This smell signals moisture trapped behind the tiles.
Warped Or Loose Tiles
Water can loosen tiles or cause them to warp. Tiles may feel loose or pop out when pressed. Warped tiles look uneven or bulged. This happens when water soaks the wall behind. Check for tiles that don’t sit flat or seem weak.
Tools And Materials Needed
Fixing a leaking pipe behind a tiled wall needs the right tools and materials. Having these ready will make the repair easier and faster. Gather everything before starting the job.
Basic Plumbing Tools
You will need a pipe cutter to remove the damaged pipe section. A wrench helps loosen and tighten pipe fittings. A screwdriver is useful for removing tiles or access panels. A flashlight brightens the workspace behind the wall. A bucket catches any water that might drip during the repair.
Safety Gear
Wear gloves to protect your hands from sharp edges and chemicals. Safety goggles shield your eyes from debris and splashes. A dust mask keeps you safe from dust and mold inside the wall. Knee pads make it comfortable to work on the floor for long periods.
Replacement Pipes And Fittings
Buy new pipes that match the old ones in size and material. Get fittings like elbows, couplings, or connectors as needed. Use pipes made of copper, PVC, or PEX based on your plumbing system. Check that all parts are clean and free of defects before installing.
Sealants And Waterproofing Materials
Use plumber’s tape to seal threaded pipe joints and prevent leaks. Apply pipe joint compound for a stronger seal on some fittings. Waterproof tape or putty can patch small leaks temporarily. After fixing, use waterproof paint or membrane to protect the wall from moisture.
Locating The Leak
Finding a leaking pipe behind a tiled wall can be tricky. Water damage might not be visible at first. Locating the leak is the first step to fixing the problem. You need to stop the water and check carefully where the leak is coming from. This section explains how to find the leak safely and effectively.
Shutting Off Water Supply
Turn off the main water supply to stop water flow. This prevents more water damage. Locate the shut-off valve, usually near the water meter or under the sink. Make sure no water runs while you check the leak. Use a wrench if the valve is hard to turn.
Removing Tiles Safely
Remove tiles carefully to avoid breaking them. Use a grout saw or utility knife to cut the grout around the tiles. Gently pry the tiles with a flat tool. Work slowly to keep tiles reusable. Keep the area clean to see the wall behind clearly.
Using Leak Detection Devices
Use leak detection tools to find hidden leaks. Moisture meters measure dampness inside walls. Infrared cameras show temperature differences caused by water. These tools help spot leaks without tearing up more tiles. They save time and reduce damage.
Identifying The Exact Leak Spot
Look for water stains, mold, or wet spots behind the wall. Listen for dripping sounds. Check pipe joints and connections closely. Use a flashlight to see inside the wall cavity. Mark the exact leak spot before repair work begins.
Fixing The Pipe
Fixing a leaking pipe behind a tiled wall requires careful work. You need to remove the broken part and replace it. This section guides you through each step. Follow these instructions to repair the pipe safely and correctly.
Cutting Out The Damaged Section
First, turn off the water supply. Use a pipe cutter or hacksaw to cut out the damaged pipe. Make sure to cut cleanly and straight. Remove any sharp edges or debris from the cut ends. This prepares the pipe for the new section.
Preparing Replacement Pipe
Measure the gap where the damaged pipe was. Cut a new pipe piece to fit this space. Check that the replacement pipe matches the old one in size and type. Clean the ends of the new pipe and the existing pipe. This helps ensure a tight connection.
Installing The New Pipe Section
Place the new pipe piece between the cut ends. Align it carefully to avoid leaks. Connect the new section using appropriate fittings. Use pipe clamps or connectors to hold it firmly in place. Make sure the pipe is straight and secure before sealing.
Sealing Connections Properly
Apply plumber’s tape or pipe sealant to the threads or joints. This prevents water from leaking out. Tighten all fittings carefully, but do not over-tighten. Check that each connection is snug and secure. Once sealed, turn the water back on to test for leaks.
Testing For Leaks
Testing for leaks is a key step after fixing a pipe behind a tiled wall. This step ensures the repair is solid and water does not escape. Proper testing saves you from future damage and costly repairs. The following methods help check for leaks effectively.
Turning Water Back On
Start by turning the main water supply back on slowly. Watch the repaired area closely. Listen for any sounds of dripping or running water. This step helps reveal obvious leaks right away. If you see water pooling or dripping, the repair needs a closer look.
Checking For Drips And Moisture
Use a dry cloth to wipe the area around the pipe. Check for any wet spots or moisture on the wall or floor. Moisture can show small leaks that are not easy to see. Look for discoloration or soft spots on the wall. These signs often mean water is still escaping.
Using Pressure Tests
Pressure tests help find leaks that you cannot see. Use a pressure gauge to check the pipe’s water pressure. Turn off all water fixtures and note the pressure level. Wait for 10 to 15 minutes. If the pressure drops, it means there is a leak. This test confirms the pipe’s condition after repair.

Credit: www.megasealed.com.au
Restoring The Wall
After fixing the leaking pipe, the next step is restoring the wall. This process helps protect the area and makes your wall look good again. Proper restoration prevents future damage and keeps your tiles strong. Follow these steps to restore the wall behind your tiles effectively.
Waterproofing The Area
Start by applying a waterproof membrane to the repaired wall. This layer stops water from seeping back into the wall. Use a brush or roller to cover the entire surface evenly. Let the waterproofing dry fully before moving on.
Replacing Tiles
Next, place the new tiles where the old ones were removed. Make sure the tiles fit well and match the existing design. Use tile adhesive to stick them firmly onto the wall. Press each tile gently and check they are level.
Grouting And Sealing
Fill the gaps between tiles with grout using a rubber float. Press grout into the joints until they are full. After the grout dries, apply a grout sealer to protect it from moisture. This step keeps the wall clean and waterproof.
Cleaning And Finishing Touches
Wipe off any grout residue from the tiles with a damp sponge. Allow the wall to dry completely before using the area. Check for any loose tiles or cracks and fix them quickly. Your wall is now restored and ready for use.
Preventing Future Leaks
Preventing future leaks behind tiled walls saves time and money. It keeps your home safe from water damage and mold. Taking simple steps can help you avoid costly repairs later. Focus on key areas to protect your pipes and walls.
Regular Inspections
Check your pipes regularly for signs of wear or damage. Look for small drips, moisture, or stains on the tiles. Early detection helps stop leaks before they grow. Use a flashlight to see behind access panels or under sinks.
Proper Pipe Installation
Install pipes carefully to prevent stress and weak points. Use the right tools and follow plumbing codes. Ensure pipes are securely fastened and have room to expand. Proper installation reduces the risk of leaks and breaks.
Using Quality Materials
Choose durable pipes and fittings designed for wet areas. Avoid cheap materials that corrode or crack easily. Good quality parts last longer and resist leaks. Check product reviews and buy from trusted brands.
Maintaining Water Pressure
Keep water pressure at safe levels to protect pipes. High pressure can cause pipes to burst or leak. Use pressure regulators if needed. Test pressure regularly with a gauge to ensure it stays stable.

Credit: www.familyhandyman.com
Credit: www.sirgrout.com
Frequently Asked Questions
How Do I Know If A Pipe Is Leaking Behind Tiles?
Look for damp spots, mold, or discoloration on tiles or walls. You might also hear water dripping sounds or see water stains.
What Tools Are Needed To Fix A Leaking Pipe Behind Tiles?
You will need a pipe cutter, wrench, plumber’s tape, sealant, and replacement pipe or fittings. A drill and tile removal tools may also help.
Can I Fix A Leaking Pipe Without Removing Tiles?
Small leaks might be patched without tile removal, but major repairs usually need tile removal. Tiles must be taken off to access the pipe fully.
How Do I Safely Remove Tiles To Access A Leaking Pipe?
Use a grout saw to remove grout around the tile first. Then gently pry tiles with a flat tool to avoid breaking them.
What Type Of Sealant Works Best For Leaking Pipes Behind Tiles?
Use waterproof silicone sealant or plumber’s epoxy putty. These sealants resist moisture and create a strong, lasting seal.
How Do I Prevent Water Damage When Fixing A Leaking Pipe?
Turn off the water supply before starting repairs. Use a bucket to catch drips and dry the area thoroughly before sealing.
How Long Does It Take To Fix A Leaking Pipe Behind Tiles?
Small leaks may take 1 to 2 hours, while bigger repairs can take a full day. Time depends on the leak’s size and tile removal.
Can A Leaking Pipe Cause Mold Behind Tiled Walls?
Yes, leaks create moisture, which encourages mold growth. Mold can damage walls and cause health problems if not fixed quickly.
Should I Call A Professional Plumber To Fix Hidden Leaks?
If you lack tools or experience, hiring a plumber is safer. Professionals can find and fix leaks without damaging walls.
How Can I Avoid Pipe Leaks Behind Tiled Walls In The Future?
Regularly check for leaks and maintain pipes well. Use quality materials and proper installation to reduce leak risks.
Conclusion
Fixing a leaking pipe behind a tiled wall can save you money and stress. Act quickly to stop water damage and mold growth. Use the right tools and follow safety steps carefully. Check your work to ensure the leak is gone.
Regularly inspect pipes to catch issues early. Taking these simple steps helps protect your home. You can handle this repair with patience and care. Don’t wait—address leaks as soon as you spot them.