
Adjusting a knee scooter takes about 10 minutes, setting the pad level with your hip joint and the handlebars at waist height. This setup gives you balanced support without straining your lower back. It suits anyone recovering from foot, ankle, or Achilles tendon surgery who can safely balance on one good leg.
Tools to adjust your knee scooter
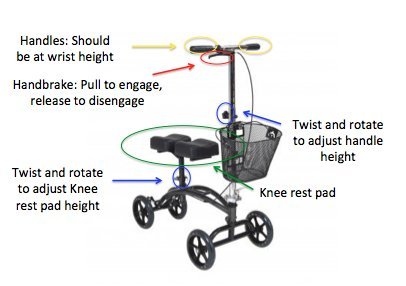
- Your knee scooter, fully unfolded on a flat floor
- The everyday shoe you plan to wear on your uninjured foot
- A simple hex key or screwdriver, only if your model uses bolts instead of quick-release clamps
- A sturdy chair or wall nearby to steady yourself during fitting
- A helper to hold the frame steady, if your balance feels shaky
Wearing a running sneaker instead of a flat slipper is a substitution that works because sole thickness changes your working height. Using thick foam cushions on top of the knee rest doesn’t work because it creates unstable wobble and raises your hip too high.
Step-by-step
- Put on the shoe you plan to walk in, then lock both parking brakes on the handlebars so the wheels stay put.
- Stand straight next to the scooter pad with your shoulders relaxed and your good foot flat on the ground.
- Open the quick-release lever or unscrew the locking knob on the seat post, then slide the knee platform up or down until the top cushion sits right below your kneecap, level with the fold of your hip. Careful: Don’t set the pad so high that your hips tilt sideways, or you’ll strain your pelvic joints and lower back within hours.
- Tighten the seat clamp firmly, then rest your injured leg on the pad to confirm your knee bends at a natural 90-degree angle while your body stands straight.
- Release the handlebar adjustment knob on the steering column and slide the grips up until they sit right at your wrist level when your arms hang down loosely. Tip: If you feel your elbows locking straight out when you hold the grips, lower the bar by 1 inch to keep a soft bend in your arms.
- Tighten the handlebar clamp firmly so the column can’t drop unexpectedly.
- Squeeze each brake lever to verify the rubber brake pads grip the rear tires tightly before unlocking the parking latches.
Adjustments for body and frame sizes
Taller or heavier builds change your setup needs, so match your settings to your physical shape before taking your first ride.
| Scooter Setup | Adjustment Time | What Is Different | What to Watch Closely |
|---|---|---|---|
| Petite user under 5’2″ | 8 to 10 minutes | Lowest column settings | Kneepad clearance above tires |
| Average user 5’3″ to 5’10” | 5 to 7 minutes | Mid-range post positions | Balanced hip alignment |
| Tall user over 5’11” | 10 to 12 minutes | Extended steering stem | Stem locking pin engagement |
| Heavy-duty bariatric frame | 12 to 15 minutes | Broader knee pad spacing | Cable tension under weight |
It’s safer to start with lower height settings and raise them one notch at a time than to overshoot on your first try and lose balance.
How to tell you did it right
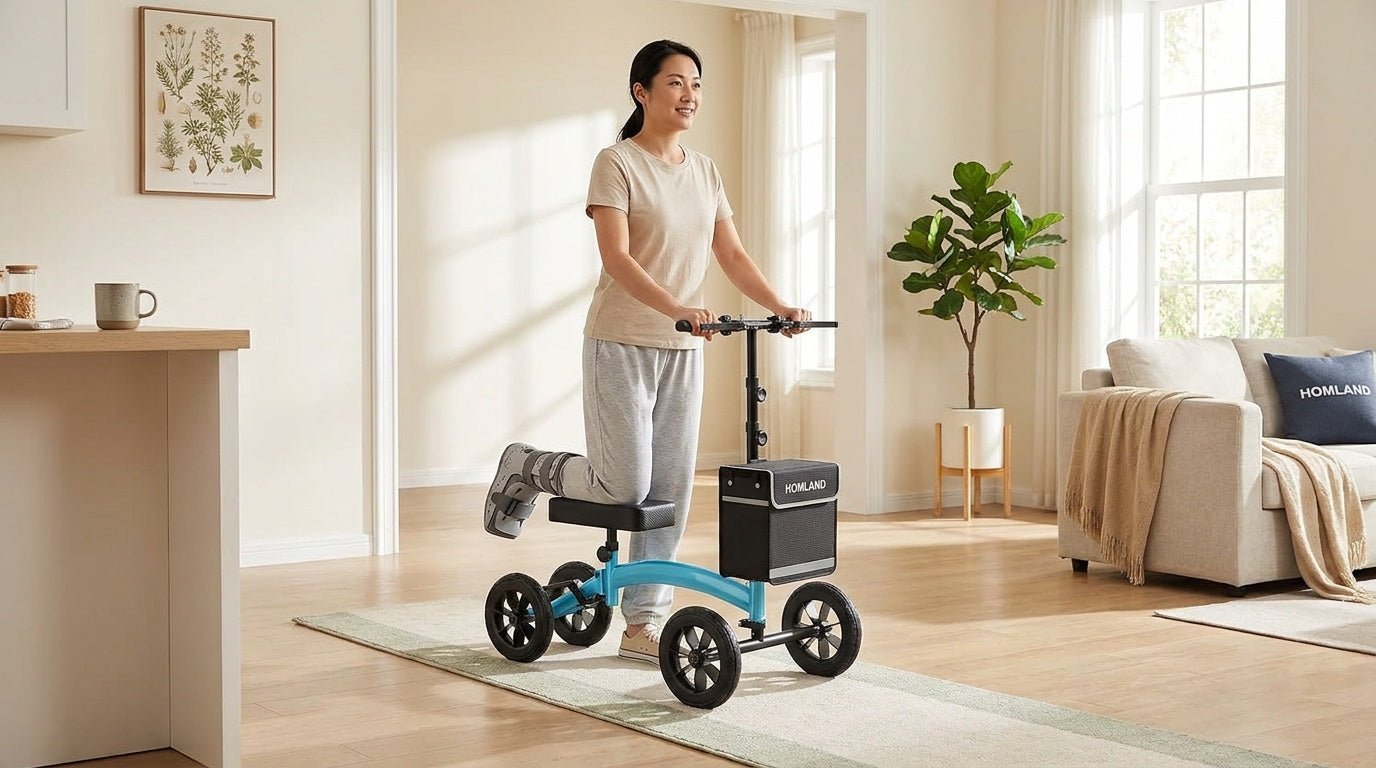
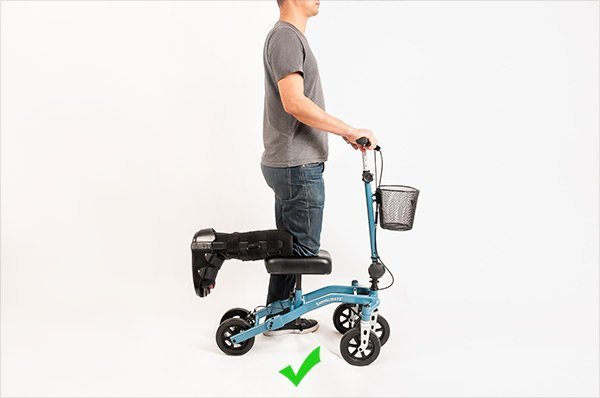
A good result lets you roll smoothly with your pelvis completely level, your back straight, and your elbows bent at roughly 15 degrees. A poor setup shows up as tilted hips, a hunched upper back, or severe pressure on your resting kneecap. The most common quality problem is side-to-side wobble while moving forward. That wobble happens because the knee platform sits higher than the hip crease of your standing leg, which forces your pelvis out of level and makes your uninjured foot swing outward. You prevent this by matching the pad height strictly to your standing hip line, keeping both hands on the grips, and checking that the clamp pin clicks all the way through the stem hole.
Safe setup and maintenance limits
The FDA medical device classification monitors mechanical mobility aids to ensure they support weight without structural collapse. After you finish setting the height, clear away loose packaging, store spare hex wrenches in a drawer, and wipe metal contact points with a dry cloth. Check the frame screws and cable tension regularly, because regular rolling can loosen tight hardware over time. If your scooter wobbles heavily after tightening or the steering binds up, stop riding immediately and take the frame to a medical supply technician for inspection.
Alternative mobility options
Standard underarm crutches
Crutches require no height tools beyond spring-button locks on aluminum tubing. They cost less than wheeled scooters and navigate tight stairs easily, but they require much more upper-body strength and increase shoulder fatigue over long days.
Hands-free crutch harness
A hands-free knee crutch straps onto your upper leg and shin. It lets you walk up steps and keeps both hands free for chores, though it takes longer to strap on and requires solid balance.
Seated transport wheelchair
A seated wheelchair eliminates all balance demands on your legs. This option costs more and demands wider doorways throughout your home, but it removes the physical strain of single-leg propulsion entirely.
Frequently asked questions
Can you adjust a knee scooter without tools?
Yes, most standard units feature tool-free quick-release levers and threaded plastic knobs. You only need a simple wrench or hex key if your specific model secures its stem with recessed metal bolts rather than hand-tightening latches.
Why is my knee scooter pad hurting my knee?
Your pad is likely set too high or sitting too far forward. When the knee rest sits above your natural hip line, your body weight concentrates directly onto your patellar tendon instead of spreading along your upper shin.
How high should knee scooter handlebars be?
Handlebars should align with your wrist creases when you stand up straight next to the steering column. This specific height keeps your shoulders relaxed and prevents you from hunching forward or locking your elbows while steering.
Is it safe to use a knee scooter on carpet?
Yes, but plush carpet creates rolling resistance that requires more pushing effort from your good leg. Check that your knee pad remains stable, and avoid thick area rug edges that could catch the small front wheels.
What happens if the steering clamp is loose?
A loose steering clamp allows the handlebars to slide downward or turn out of line with your front wheels. This sudden loss of steering control can tip the frame sideways and cause a dangerous fall.
How do you tighten loose knee scooter brakes?
Turn the barrel adjuster on the brake cable near the handlebar counter-clockwise to remove slack. If the cable still sags, loosen the lower cable anchor bolt near the wheel, pull the wire snug with pliers, and re-tighten the nut.
Final Thoughts
Once you’re comfortable, take a short practice roll around your home to ensure you feel steady and secure. If you notice any wobbling or discomfort, don’t hesitate to tweak the settings again. You’ll find that getting it just right makes your daily movement much easier while you’re on the mend.
Related guides