
Credit: flowyline.com
Assessing Your Table’s Condition
Before you start restoring your vintage enamel top table, a careful assessment is crucial. Understanding your table’s current state guides your restoration plan. It helps you choose the right methods. It also prevents further damage. Take your time. Inspect every part closely.
Identifying Damage Types
Look for chips. Note any cracks. Examine the surface for stains. Rust spots are common. These affect the enamel’s look. Some damage is superficial. Other damage goes deeper. Knowing the type matters. It dictates your repair approach.
Determining Enamel Integrity
Is the enamel loose? Does it feel powdery? Check for bubbling. These signs show weakness. The enamel might be failing. Test small areas gently. A solid surface is good. A compromised surface needs care. Protect what remains. Address weaknesses first.
Spotting Structural Issues
Inspect the table legs. Are they wobbly? Check the frame. Look for rust or bending. The tabletop support is key. Ensure it is strong. Loose joints need tightening. Damaged structures are unsafe. Fix these before the top. A stable base is essential.
Gathering Your Supplies
Gathering your supplies is your first step. You’ll need mild soap and a soft cloth. Gather degreaser and a good polish.
Restoring a vintage enamel top table is rewarding. You need the right tools. Preparation makes the job easier. Gather your supplies before you begin. This ensures a smooth restoration process.Cleaning Agents
You need good cleaners. Mild dish soap works well. For tougher grime, use a degreaser. A soft scrub brush is helpful. An old toothbrush cleans tight spots. Baking soda paste tackles stains.Repair Materials
Small chips need attention. Enamel repair paint is key. Match the original color. For larger cracks, consider epoxy. A putty knife spreads filler. Sandpaper smooths the repair.Protective Gear
Safety comes first always. Wear rubber gloves. Protect your hands from chemicals. Safety glasses shield your eyes. Work in a well-ventilated area. This prevents inhaling fumes.Optional Tools
A putty knife helps scrape. A fine-grit sandpaper smooths. A tack cloth removes dust. A good light helps see details. These tools make work better. They improve the final look.Cleaning The Enamel Surface
Restoring your vintage enamel top table begins with a clean surface. This is a crucial first step. It reveals the true condition of the enamel. A clean surface allows for better assessment. It prepares the way for further restoration work. Let’s get it sparkling again.
Initial Dust And Grime Removal
Start with a soft cloth. Gently wipe away loose dust. Then, use a damp cloth. This removes surface grime. Avoid abrasive scrubbers. They can scratch the enamel. A mild soap solution works well. Wash the entire surface. Get into all the nooks.
Tackling Stains And Discoloration
Stubborn stains need attention. Try a paste of baking soda. Apply it directly to the stain. Let it sit for a while. Gently scrub with a soft brush. For tough discoloration, consider a specialized cleaner. Always test in an inconspicuous spot first. Patience is key here.
Deep Cleaning Techniques
For a deeper clean, use a non-abrasive cleaner. Cream cleaners are often effective. Apply them with a soft sponge. Work in small sections. This ensures thorough cleaning. You can also try a magic eraser. Use it very lightly. It can lift persistent marks. Always rinse well after.
Rinsing And Drying
Thorough rinsing is vital. Use a clean, damp cloth. Wipe away all cleaning residue. Leftover soap can dull the finish. Then, dry the surface completely. A soft, dry towel works best. Buff gently. This restores its shine. A dry surface prevents water spots.
Credit: www.houseofhawthornes.com
Repairing Chips And Cracks
Chips and cracks mar the beauty of vintage enamel. Repairing them is crucial for restoration. This process restores the table’s original charm. It protects the surface from further damage. Proper repair is a rewarding task.
Choosing The Right Filler
Select a suitable filler. Epoxy fillers work well. They are strong and durable. Choose a filler for enamel surfaces. Some fillers are specifically made for porcelain. Read product labels carefully. Test the filler in an inconspicuous area.
Applying And Smoothing Filler
Clean the damaged area first. Remove all loose debris. Apply the filler sparingly. Use a small putty knife. Fill the chip or crack completely. Smooth the filler surface. Remove excess filler immediately. Let the filler cure fully. Follow manufacturer instructions.
Sanding For A Seamless Finish
Once cured, sand the filler. Use fine-grit sandpaper. Start with 220-grit paper. Sand gently in a circular motion. Feather the edges of the filler. Blend it into the surrounding enamel. Progress to even finer grits. Aim for a smooth, level surface. Feel the difference with your fingertips.
Color Matching Strategies
Color matching is important. Find the original enamel color. Look for paint or pigment kits. Small amounts are usually needed. Mix colors slowly and carefully. Test the color on a scrap piece. Compare it to the table’s color. Apply a thin coat of matched paint. Let it dry completely. Adjust the color as needed. Patience ensures a good match.
Addressing Rust Spots
Rust spots mar your vintage enamel table. Gentle cleaning removes them. Restore its shine with simple steps.
Rust is a common enemy. It attacks enamel tops. Addressing rust spots is crucial. It keeps your table looking good. It also prevents further damage. Let’s tackle this problem head-on.Rust Removal Methods
Several methods work. You can use fine-grit sandpaper. Gently rub the rust away. A paste of baking soda helps too. Mix it with water. Apply the paste. Let it sit. Scrub gently. For stubborn rust, try commercial rust removers. Follow product instructions carefully. Always test in an inconspicuous area first. This protects your enamel.Preventing Future Rust
Prevention is key. Keep the enamel dry. Wipe up spills immediately. Use coasters for drinks. Avoid abrasive cleaners. They can scratch the surface. Mild soap and water are best. Dry the table thoroughly. Store it in a dry place. Humidity is rust’s friend.Sealing Repaired Areas
Once rust is gone, seal it. This protects the metal. Use a clear enamel repair pen. It fills small chips. For larger areas, consider enamel paint. Match the color closely. Apply thin coats. Let each coat dry completely. This creates a smooth finish. It shields against future rust. Your table will shine again.Restoring The Base
Restoring the base is crucial. It gives your table its strength. A solid base makes the table look complete. We will make it look like new.
Cleaning Metal Components
First, remove all dirt. Use a soft brush. A mild soap works well. Scrub gently. Rinse with clean water. Dry all parts thoroughly. This prevents rust. Check for loose screws. Tighten them carefully. This makes the base sturdy. Polish shiny metal parts. Use a metal polish. Buff until it gleams. Your metal is now clean.
Dealing With Wood Elements
Inspect the wood for damage. Look for cracks or chips. Fill small holes with wood filler. Let it dry completely. Sand the wood smooth. Use fine-grit sandpaper. Wipe away all dust. Check for old finishes. Remove peeling paint. Use a paint stripper. Follow product instructions. Clean wood thoroughly. Ensure it is dry.
Painting Or Refinishing Options
You can paint the base. Choose a durable paint. A metal primer is helpful. Apply thin coats of paint. Let each coat dry. Two coats are often best. This gives good coverage. You can also stain wood. Select a wood stain. Apply it evenly. Wipe off excess stain. A clear topcoat protects wood. It adds a nice shine. Choose the finish you like. Your base will look great.
Applying Protective Coatings
Applying protective coatings is the final step. This step safeguards your hard work. It keeps your table looking great. Protect your beautiful enamel surface. This ensures lasting beauty.
Enamel Sealants
Use a quality enamel sealant. This creates a strong barrier. It shields against stains. It also fights off moisture. Follow product instructions closely. Apply thin, even coats. Let each coat dry completely. This sealant protects the enamel. It prevents chips and cracks.
Waxing For Shine
Waxing adds a beautiful shine. It also offers extra protection. Use a good paste wax. Buff it into the surface. Work in small sections. Use a soft, lint-free cloth. A little wax goes a long way. This enhances the enamel’s glow. It makes cleaning easier too.
Choosing The Right Finish
Select a finish for your needs. Do you want a matte look? A satin finish is popular. High gloss adds brilliance. Consider how you use the table. A durable finish is best. Test finishes in an unseen area. Ensure the finish complements your style. It should enhance the table’s charm.
Credit: flowyline.com
Maintaining Your Restored Table
Protect your revived enamel table. Gentle cleaning keeps its shine. Avoid harsh chemicals. Enjoy your beautiful, restored piece for years.
You worked hard. Your vintage enamel top table shines. Now, keep it looking great. Proper care prevents future damage. This section guides you. Protect your beautiful restoration.Daily Care Tips
Wipe the surface often. Use a soft, damp cloth. Dry it completely afterward. This prevents water spots. Remove spills right away. Food particles can stain. Gentle cleaning is key. Avoid abrasive scrubbers. They can scratch the enamel.Avoiding Harsh Chemicals
Harsh cleaners damage enamel. They can dull the finish. Use mild soap and water. A pH-neutral cleaner works. Avoid ammonia-based products. Bleach is also a no-go. Acetone can strip the finish. Stick to gentle solutions. Test cleaners in a small spot. This ensures safety.Long-term Preservation
Protect the table from heat. Use trivets or hot pads. Direct heat causes cracks. Avoid prolonged sun exposure. Sunlight can fade colors. Store placemats neatly. They protect from scratches. Regular dusting is good. This keeps it clean. Enjoy your revived table. It will last for years. `Frequently Asked Questions
What Is An Enamel Top Table?
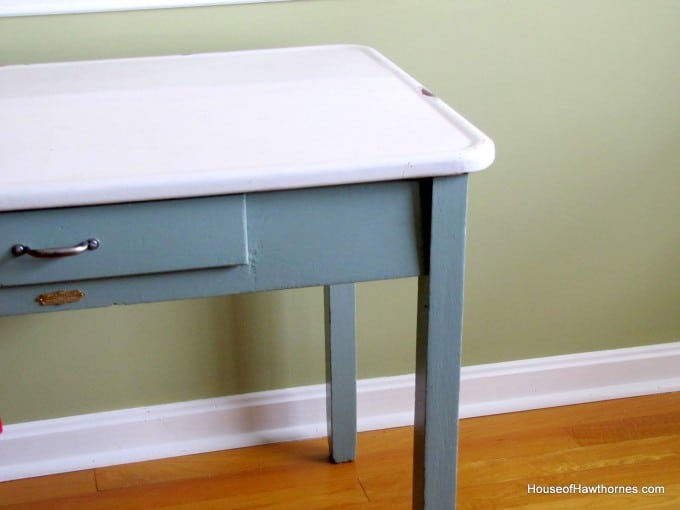
An enamel top table has a metal surface covered with a glassy coating. This coating is often white or speckled. It offers a durable, easy-to-clean finish.
Can I Restore A Damaged Enamel Top?
Yes, some damage can be restored. Chips and scratches are common issues. Repair kits and careful cleaning can help.
How Do I Clean An Old Enamel Table?
Start with mild soap and water. Avoid harsh scrubbers. For tough stains, try a paste of baking soda.
What Are Common Enamel Table Problems?
Chipping, scratching, and rust are frequent. Stains can also be a challenge. Heat damage is another concern.
How To Fix Chips On Enamel Tables?
Special enamel repair kits are available. These kits often contain a filler and colorant. Follow the product instructions carefully.
Is Enamel Top Table Restoration Safe?
Yes, with proper precautions. Use gloves and good ventilation. Avoid breathing in dust from sanding.
Where To Find Enamel Table Parts?
Look for vintage furniture stores. Online marketplaces are also good sources. Sometimes, old appliance parts can be adapted.
Conclusion
Your vintage enamel table can shine again. Restoration brings back its charm. It’s a rewarding project. Take your time with each step. Enjoy your beautiful, renewed table. It’s a piece of history. Make it a centerpiece.