
Is your printer acting up, or are you just looking for a more reliable connection? Connecting your printer with an Ethernet cable might be the simple solution you need.
Forget flimsy Wi-Fi signals that drop at the worst possible moment. With a wired Ethernet connection, you’ll get a stable, fast link that makes printing a breeze. This guide will walk you through exactly how to connect your printer using an Ethernet cable, step-by-step.
You’ll be printing smoothly in no time, so let’s get started!
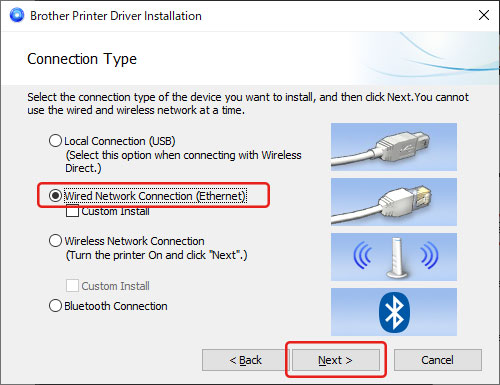
Credit: support.brother.com
Why Ethernet For Your Printer?
Ethernet offers a stable connection for your printer. This ensures reliable printing. Connect your printer with an Ethernet cable for better performance.
You want a better printer connection. Ethernet offers many benefits. It is a reliable choice for your printer.Speed And Stability
Ethernet provides fast data transfer. Your print jobs will complete quickly. It offers a very stable connection. Network interference is less likely. This means fewer printing errors.Enhanced Security
Ethernet connections are secure. They are harder to access remotely. This protects your sensitive documents. Your network remains safer.Reliability Over Distance
Ethernet cables work well over distance. Wi-Fi signals can weaken. This is true for longer runs. Ethernet maintains a strong signal. It ensures consistent performance.Dedicated Connection
An Ethernet connection is direct. It is not shared like Wi-Fi. Your printer gets its own pathway. This reduces network congestion. Printing remains smooth.Gather Your Supplies
First, gather your essential items. You’ll need your printer and an Ethernet cable. Ensure your router or switch is ready nearby.
Before you connect your printer, gather needed items. This makes the process smooth. You will need a few key things.Printer And Ethernet Port
Check your printer. Does it have an Ethernet port? Most modern printers do. Look for a small square port. It looks like a phone jack. This is where the cable plugs in.Ethernet Cable
You need an Ethernet cable. This cable connects devices. It has clear plastic ends. Ensure the cable is long enough. It must reach your printer. It must reach your router.Router Or Network Switch
You need a router. Your router provides network access. A network switch also works. It expands network connections. Both have Ethernet ports. Find an available port. Plug the Ethernet cable there.Locate Printer’s Ethernet Port
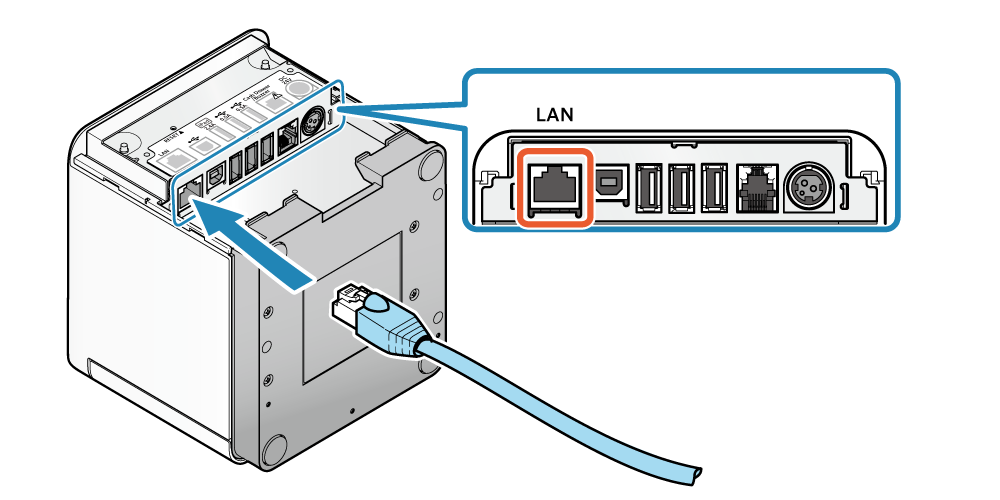
Find your printer’s Ethernet port. It looks like a small, rectangular opening. Plug one end of your Ethernet cable here.
This is your first step. Finding the printer’s Ethernet port is easy. It looks like a small phone jack. You need to know where to look. This section guides you.Locating The Ethernet Port
Look at the back of your printer. Most Ethernet ports are there. Some printers have them on the side. Check the printer’s manual. It will show you the exact spot. The port has tiny lights. These lights signal connection status.Identifying The Port Shape
The port is rectangular. It has eight small pins inside. This shape is standard. It is different from a USB port. USB ports are also on printers. Do not confuse them. The Ethernet port is wider. It is also shorter.Checking Around The Printer
Scan the entire printer. Look for a port labeled “Ethernet.” Sometimes it says “LAN.” This means Local Area Network. It is the same thing. Feel for a small opening. It should be a snug fit. This is where the cable goes.Credit: support.munbyn.com
Connect To Your Router
Plug one end of the Ethernet cable into your printer. Connect the other end to an available LAN port on your router. Your printer is now physically connected.
This section guides you. You will connect your printer to your router. This is a simple step. It makes printing easy. Your router is the network hub. It manages all your devices. Your printer needs to join this network. An Ethernet cable makes this connection.Locate Router Ethernet Ports
Find the available ports. Routers have several Ethernet ports. They are usually on the back. These ports have little lights.Connect Printer To Router
Take one Ethernet cable end. Plug it into your printer’s port. Take the other cable end. Plug it into an open router port.Confirm The Connection
Check the printer’s display. It should show a network connection. The lights on the router port may blink. This indicates activity. Your printer is now online.Power Up And Detect
Powering up your printer and letting it connect is the next logical step. This phase ensures your printer gets the electricity it needs. It also allows it to become visible on your network. Think of it as waking up your printer. Then, you tell it to join the party.
Power On Your Printer
Locate the power button. Press it firmly. Your printer will begin to boot up. Wait for the startup sequence. Lights will flash. A screen may appear. This is normal.
Connect The Ethernet Cable
You already plugged in the cable. Now, ensure it is secure. Check both ends. One end is in the printer. The other is in your router. A solid connection is key.
Observe Network Lights
Look at your printer’s network port. Small lights usually sit there. A green light often means connection. An amber or yellow light might blink. This indicates data transfer. No lights? Check the cable again.
Printer Network Discovery
Your printer now seeks a network. It is looking for your router. The router assigns it an IP address. This address makes it unique. It allows other devices to find it.
Check Printer Display
Your printer’s screen is helpful. It might show network status. Look for a Wi-Fi icon. Or it may say “Connected.” If it shows an error, note it. This information is useful.
Install Printer Drivers
The printer needs special software. This software is called drivers. Drivers let your computer talk to the printer. You must install them. This step is very important. It makes printing possible.Automatic Detection
Your computer might find the drivers. It often happens automatically. Plug in the Ethernet cable. Turn on your printer. Wait a moment. Windows or macOS may show a message. It says it is installing a device. This is a good sign. The operating system is finding the drivers. It installs them for you. This is the easiest way.Manual Installation
Sometimes automatic detection fails. Do not worry. You can install drivers manually. First, find your printer model. Look on the printer itself. Check its box. Go to the printer manufacturer’s website. Search for your model. Download the latest drivers. Find the downloaded file. It is usually an executable file. Run this file. Follow the on-screen instructions. The installer will guide you. It will install the necessary software. You might need to restart your computer. This ensures drivers work correctly.Configure Printer Settings
Configuring your printer settings is a crucial step. This makes your printer talk to your network. It ensures smooth printing. You need to tell the printer where it lives on the network. This section guides you through that process.
Assigning An Ip Address
Your printer needs an address. This is an IP address. It’s like a house number. Your router usually gives this. This is called DHCP. You can also set it manually. A static IP address works best. It never changes. This avoids connection issues. Check your printer’s manual. It explains how to do this. Enter the IP address into your printer. Then save the changes.
Network Settings Check
Verify network settings. Ensure your printer is connected. The Ethernet cable must be secure. Your printer’s screen shows status. Look for a network icon. It should indicate a connection. Confirm the subnet mask. It should match your network. The default gateway is important. It is usually your router’s IP. These settings ensure communication. Your computer finds the printer. Printing then becomes simple.
Credit: www.star-m.jp
Test Your Connection
You have connected your printer. Now, it is time to check. Does your printer talk to your computer? This section confirms it. Testing is a simple but vital step. It ensures your network setup works well.
Print a test page. This is the easiest check. Go to your computer’s printer settings. Find your newly connected printer. Select the option to print a test page. Watch your printer. Does it start printing? This confirms basic connectivity. It shows your computer can send data.
Check the printer’s display. Many printers show network status. Look for an icon. It might look like a network signal. Some printers have a status light. A solid green light often means success. A blinking light may signal a problem. Consult your printer’s manual for details. It explains what the lights mean.
Try printing a document. Open any document. Select your networked printer. Click print. Does the document come out? This is a real-world test. It checks if printing complex files works. It confirms your printer is ready. You can now print from any device. This confirms your Ethernet connection is solid.
Troubleshooting Common Issues
Sometimes, your printer won’t connect. Network issues can happen. Don’t worry. We can fix most problems. This section helps you troubleshoot. Find solutions for common printer connection issues.
No Connection Detected
Is your printer offline? Check the Ethernet cable. Ensure it’s plugged in firmly. Try a different cable. Test the port on your router. It might be damaged. Restart your printer. Restart your router too. This often clears glitches. Verify the printer’s IP address. It should be on your network. Check your printer’s display. Look for network status. Make sure Wi-Fi is off. Ethernet needs to be active.
Slow Printing
Is printing taking too long? Your network speed matters. A bad cable can slow things. Use a good quality Ethernet cable. Cat 5e or Cat 6 is best. Too many devices clog the network. Disconnect unused devices. Update your printer’s firmware. Old firmware causes issues. Check your router’s settings. Ensure Quality of Service (QoS) is enabled. This prioritizes printing traffic. Clear the print queue. Restart your computer. Restart your printer.
Driver Problems
Are printer drivers causing trouble? Uninstall old drivers completely. Download the latest drivers. Get them from the printer maker’s site. Install them with the printer off. Turn the printer on later. Follow the installation prompts carefully. Your operating system needs drivers. Ensure they match your OS version. Reinstalling drivers often fixes errors. Check Device Manager for errors. Look for yellow exclamation marks. Update drivers from there.
Ethernet Vs. Wi-fi
Connect your printer with an Ethernet cable. This provides a stable, fast network connection. Forget Wi-Fi dropouts for reliable printing.
Ethernet Vs. Wi-fi: What’s The Difference?
Choosing how to connect your printer matters. You have two main options. These are Ethernet and Wi-Fi. Each offers different benefits. Understanding these helps you pick the best way. It ensures your printer works well.Why Choose Ethernet For Your Printer?
Ethernet provides a stable connection. It uses a physical cable. This cable plugs into your router. It also plugs into your printer. This direct link is very reliable. It is less prone to interference. Speed is often faster too. This means quicker print jobs. It is a great choice for busy offices. Or homes with many devices.When Is Wi-fi A Better Option?
Wi-Fi offers wireless convenience. No cables are needed. This keeps your desk tidy. It allows placement flexibility. You can put your printer anywhere. It needs a strong Wi-Fi signal. Signal strength can vary. Obstacles can weaken it. Some printers might be slower. This depends on your network. It is good for simple home use. Or when cable runs are difficult.Making The Right Choice For You
Consider your printing needs. How fast do you print? How important is stability? Do you have many Wi-Fi devices? Ethernet offers top reliability. Wi-Fi provides freedom. Think about your space. Think about your network. The best connection serves you well.Frequently Asked Questions
What Is An Ethernet Printer Connection?
An Ethernet printer connects directly to your network. This uses a special cable for a stable link. It’s faster than Wi-Fi.
How Do I Physically Connect My Printer?
Plug one end of the Ethernet cable into your printer. Connect the other end to your router or switch. Make sure both ports are clear.
Will My Printer Work With Ethernet?
Most modern printers support Ethernet connections. Check your printer’s manual for confirmation. It will list the available ports.
What Are The Benefits Of Ethernet Printing?
Ethernet offers a very reliable connection. It provides faster print speeds. This reduces network interference too.
Can I Use Any Ethernet Cable?
Yes, a standard Cat 5e or Cat 6 cable works. These are common and widely available. Ensure the cable is not damaged.
How Do I Set Up The Printer On My Network?
Access your printer’s network settings. Select Ethernet as the connection type. Follow on-screen prompts for IP setup.
What If My Computer Can’t Find The Printer?
Restart both your printer and computer. Check the Ethernet cable connection again. Ensure your printer is on the same network.
Conclusion
Connecting your printer via Ethernet is simple. You gain a stable, fast network connection. No more Wi-Fi worries. Just plug in the cable. Your printer is ready to print. Enjoy reliable printing for everyone. It’s a solid choice.