
To wire a dirt bike headlight, run fused 16-gauge wire from an onboard battery or lighting stator through a handlebar switch to your light. It suits trail riders who own a bike with an electric starter best.
Tools to wire your dirt bike headlight
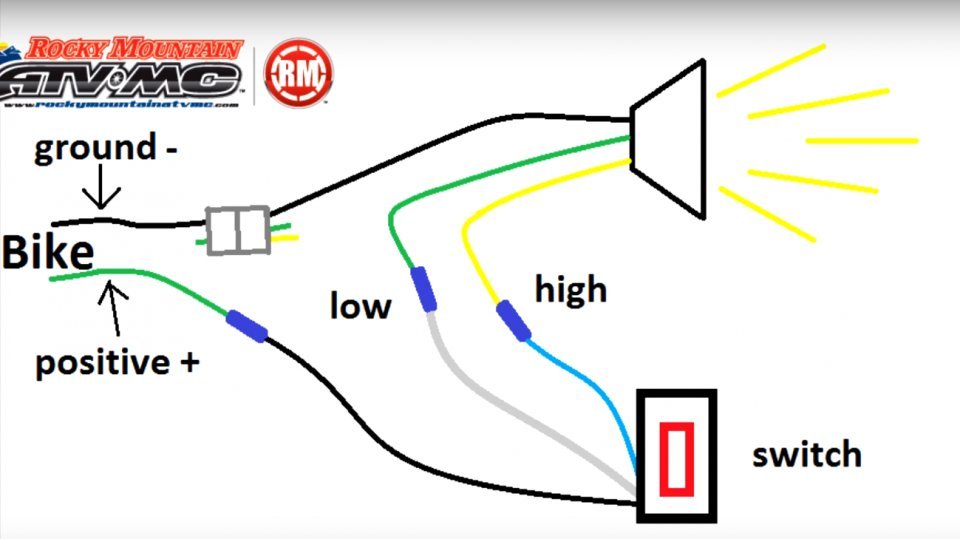
- A 12-volt LED dirt bike headlight mask rated between 15 and 30 watts
- 10 feet of 16-AWG automotive-grade primary wire (red for positive, black for ground)
- An in-line fuse holder with a 5-amp blade fuse
- A handlebar-mounted on/off switch that a technician should verify is appropriate for your electrical system
- 1/4-inch heat-shrink tubing and four heat-shrink butt connectors
- A mechanical wire stripper and crimper tool
- Ten 6-inch nylon zip ties
Use heat-shrink butt connectors to seal out trail water; don’t substitute twist-on wire nuts because vibration shakes them loose. If your bike has no battery and an older AC-only stator, you’ll need an aftermarket regulator-rectifier installed by a motorcycle mechanic to prevent blowing your bulbs.
Step-by-step
- Remove the seat and side panels with your standard 8mm or 10mm socket to reach the electrical system.
- Disconnect the negative battery cable first using a Phillips screwdriver, then take off the positive cable so you don’t short the system while working.
- Mount the headlight assembly to your front fork legs using the rubber straps, leaving about 2 inches of slack behind the mask.
- Fasten the handlebar toggle switch right next to the left clutch perch, tightening the clamp screw to 2 Newton-meters.
- Crimp one side of the in-line fuse holder to the battery positive terminal lead, leaving the 5-amp fuse out of the socket for now. * Careful: Never connect live wiring without removing the fuse, or an accidental ground touch will melt your wire harness.
- Run the red wire from the fuse holder along the main frame spine up to the input lead of your handlebar switch. * Tip: Follow the factory clutch cable path and secure the wire with zip ties every 6 inches, leaving enough slack at the steering head so turning full lock doesn’t pull the harness.
- Connect the switch output lead to the positive red wire of your LED headlight using a crimped butt connector, then shrink it with a heat gun for 5 seconds.
- Ground the black headlight wire directly to the bare metal frame or the battery negative post. * Tip: If grounding to the frame, scrape off the powder coat with sandpaper down to bare steel, or the light will flicker.
- Reconnect the battery terminals, push the 5-amp fuse into its holder, and flick the switch to verify it lights up.
Power source comparison and limits
Your setup changes depending on whether your bike already carries a 12-volt battery or runs purely on magneto power.
| Bike setup | Install time | Added hardware | Watch point |
|---|---|---|---|
| Factory 12V battery | 1 hour | In-line fuse holder | Total draw against starter load |
| Stator with DC output | 2 hours | Standalone capacitor | Voltage dip at low idle speed |
| AC stator only | 3 to 4 hours | Regulator-rectifier unit | Overheating the small stator coils |
| Standalone tool battery pack | 45 minutes | Quick-release bracket | Voltage cutoff before cell drains |
It’s safer to run a modest 20-watt light than a massive light bar that overdraws your charging circuit.
How to tell you did it right
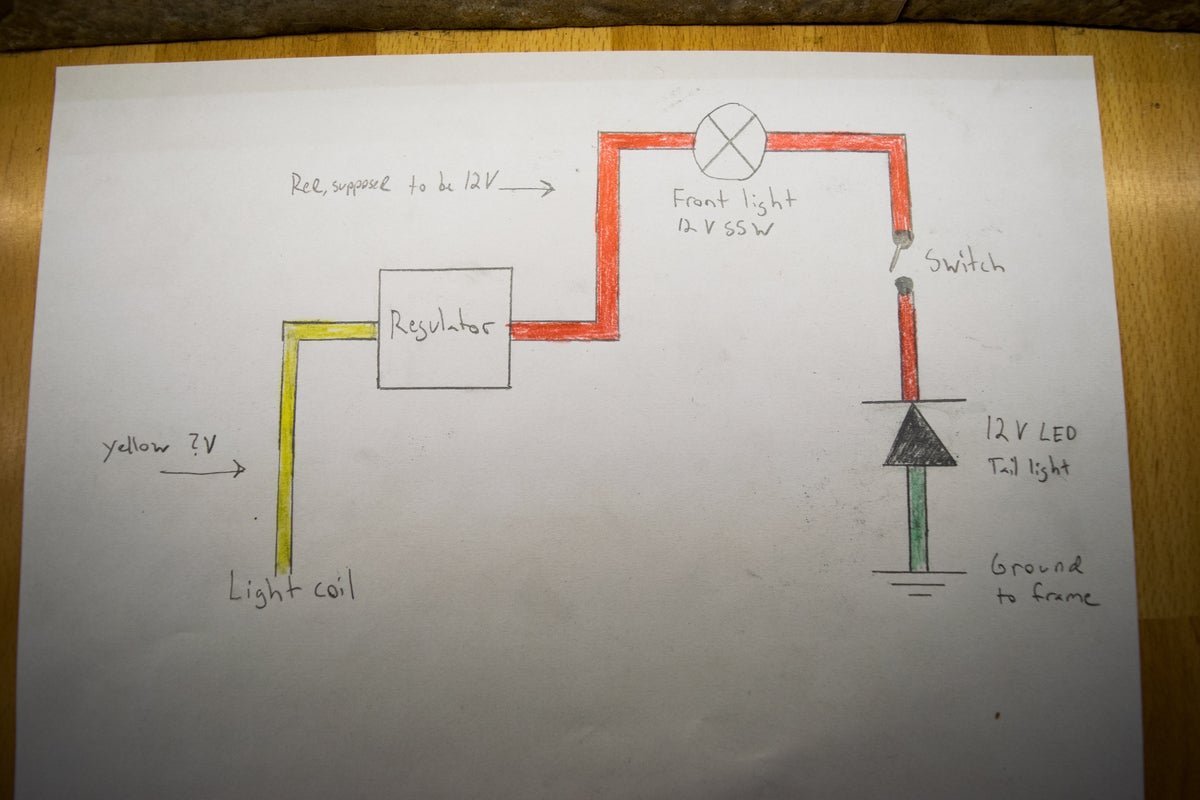
A correct installation gives you a steady, bright beam that stays lit even when the engine drops to idle. A bad install shows a flickering beam, melted wire insulation, or a drained battery after two rides. Weak grounds cause most flickering because paint insulates the bike frame from the return path. You can prevent this failure by using a dedicated ground wire directly back to the battery negative post. Turn the handlebars completely from left to right stop to make sure the wiring doesn’t pinch against the steering stops. If X causes the wire to pull tight, reroute along the frame; if Y gives too much slack, pull the excess back under the fuel tank.
Street legality and final wrap-up
If you ride on public roads, the light must meet federal beam patterns. The National Highway Traffic Safety Administration motorcycle equipment requirements set standards for forward-facing illumination and beam angles under federal motor vehicle safety rules. Check local highway laws, since pure off-road lighting rarely meets street-legal DOT cutoffs. After finishing, bundle all loose harness sections inside split-loom tubing, zip-tie them away from the hot exhaust header, and reinstall your fuel tank and plastics.
Other ways to do it
Standalone lithium battery pack
Mount a small 12-volt drill battery or rechargeable lithium pack in an airbox pouch. This completely skips the bike’s stock electrical system, though you’ll have to recharge the battery manually after roughly three hours of night riding.
Total-loss lighting harness
Buy a pre-assembled plug-and-play harness designed for off-road bikes. It costs more money than loose spools of wire, but it cuts your install time down to 30 minutes because all switches and fuses come pre-wired.
High-output stator upgrade
Replace the factory stator coils with an aftermarket rewind unit from a brand like Ricky Stator. This trade-off requires opening the engine side case and draining the oil, but it provides up to 100 watts of steady DC power.
Frequently asked questions
Can you wire a dirt bike headlight without a battery?
Yes, but only if your bike’s stator produces direct current or if you add a regulator-rectifier. Pure alternating current from an older dirt bike engine will blow standard 12-volt DC LED lights almost instantly.
Why does my dirt bike headlight flicker at idle?
Your engine is turning too slowly for the stator to produce enough output voltage. Switching to a setup that draws power from a small 12-volt battery instead of directly from the stator fixes this immediately.
What size fuse do you need for a dirt bike headlight?
Use a 5-amp fuse for standard LED lights pulling 20 to 40 watts. That provides plenty of operating room while still blowing fast enough to protect thin 16-gauge wire if a trail crash pinches the harness.
What happens if you wire an LED light backwards?
Nothing will light up, but you usually won’t damage modern quality lights. LED chips only pass power in one direction, so swap your positive and negative leads if the unit stays dark with the switch on.
Is it safe to wire a light directly to the battery?
No, because without a switch the light runs constantly, and without an in-line fuse a pinched wire will start an electrical fire. Always install both a fuse and a handlebar switch.
Final Thoughts
Once everything is connected, take your bike out for a short evening ride to check the beam’s focus. You’ll want to adjust the angle so it doesn’t blind oncoming riders or point too low. It’s a simple tweak, but you’ll be glad you did it when the sun finally goes down.