
Ready to give your tabletop a stunning, durable makeover? Epoxy resin is a fantastic way to achieve a glossy, protective finish that can transform old, worn-out surfaces into showpieces.
But if you’re new to working with epoxy, you might be wondering where to start. Don’t worry! This guide will walk you through exactly how to seal a tabletop with epoxy, step-by-step. You’ll learn everything you need to know to get a professional-looking result that will wow your friends and family.
Let’s dive in!

Credit: help.bestbartopepoxy.com
Why Seal Your Tabletop?
Sealing your tabletop protects its beauty. Epoxy creates a tough, glossy shield. This guards against spills and scratches.
Sealing your tabletop is essential. It protects your beautiful surface. Epoxy creates a strong, lasting barrier. This barrier keeps your table looking new. It is a smart investment for your furniture.Protect Against Damage
Wood tables stain easily. Spills seep into the grain. Liquids can warp the wood. Epoxy seals the surface completely. It stops stains from penetrating. Your table resists water damage. It also resists heat damage. Scratches become less of a problem. The epoxy is very hard.Enhance Its Appearance
Epoxy adds a deep shine. It makes colors pop. Wood grain looks richer. It creates a smooth, glass-like finish. This finish is very attractive. It elevates your table’s look. It makes your table a centerpiece.Extend Its Lifespan
A sealed table lasts longer. You avoid costly repairs. Regular cleaning is easier. Just wipe it down. No special cleaners are needed. Epoxy prevents wear and tear. Your table stays beautiful for years. It is a worthwhile project.Choosing The Right Epoxy
Selecting the correct epoxy is vital. It ensures a durable, beautiful finish for your table. Properly sealing your tabletop protects it from damage.
Choosing the right epoxy is crucial. Your tabletop’s look depends on it. It also affects durability. Don’t pick just any epoxy. Understand your project’s needs. This guide helps you choose wisely.Coating Epoxy Vs. Casting Epoxy
Tabletops need a specific type. Coating epoxy is for thin layers. It’s designed for sealing surfaces. Casting epoxy is for deep pours. It creates thick, clear layers. For a tabletop seal, choose coating epoxy. It self-levels well. It provides a hard, protective finish. Casting epoxy is too thick for this. It can trap air bubbles.Uv Resistance And Food Safety
Consider UV protection. Sunlight can yellow epoxy. It can degrade the finish over time. Look for epoxy with UV inhibitors. This keeps your tabletop bright. Does your tabletop need food contact? Some epoxies are food-safe. This is important for dining tables. Check the product label carefully. Ensure it meets food safety standards. This protects your family’s health.Gather Your Supplies
First, gather all necessary items. You will need epoxy resin, a hardener, mixing cups, stir sticks, and protective gear. Having everything ready makes the process smooth.
Gathering your supplies is the first step. It ensures a smooth epoxy project. You will have everything ready. This prevents interruptions. A prepared workspace is key.Epoxy Resin And Hardener
You need two main parts. Get a good epoxy resin. Find the correct hardener. They come in a kit. Follow the product instructions.Mixing Cups And Sticks
Use clean mixing cups. Get several disposable ones. You need stirring sticks too. Plastic or wood works well. Mix thoroughly.Protective Gear
Safety is very important. Wear chemical-resistant gloves. Use safety glasses always. Work in a well-ventilated area. A respirator is recommended.Heat Gun Or Torch
You will need a heat source. A heat gun is best. A small propane torch works. Use it to remove bubbles. Move it quickly.Level
Your tabletop must be level. Use a bubble level. Check it before pouring. Adjust the table if needed. A level surface is crucial.Painter’s Tape
Protect the table edges. Use good quality painter’s tape. Seal it down firmly. This contains the epoxy. Remove it carefully later.Sandpaper (various Grits)
Prepare the tabletop surface. You need sandpaper. Get different grit sizes. Start with coarse grit. Finish with fine grit. A smooth surface is vital.Prepare The Tabletop
Proper preparation is key. This step ensures epoxy adheres well. A smooth, clean surface creates a beautiful finish. Take your time here. It makes a big difference.
Clean And Degrease
Start with a thorough cleaning. Remove all dirt and dust. Use a good degreaser. This cuts through grease and oil. Wipe the surface clean. Let it dry completely. Grease prevents epoxy bonding. You need a spotless surface.
Sand For Adhesion
Sanding creates a rough surface. Epoxy sticks better to rough surfaces. Use medium-grit sandpaper. Aim for around 100-150 grit. Sand the entire tabletop. Focus on getting an even texture. Sanding helps epoxy grip. It prevents peeling later.
Wipe Down And Dry
After sanding, wipe again. Remove all sanding dust. A tack cloth works well. It picks up fine particles. Ensure the surface is dry. Moisture is bad for epoxy. It can cause bubbles. A clean, dry surface is vital.
Level The Surface
The tabletop must be level. Epoxy flows downhill. A tilted surface causes unevenness. Use a level to check. Shim the table if needed. Adjust legs for stability. A level surface ensures a smooth coat. This creates a professional look.
Masking And Containment
Protect your project. Masking tape creates a barrier. This keeps epoxy from spreading. Containment prevents messy drips.
Proper masking and containment are vital. This step prevents epoxy spills. It protects your workspace. A clean finish starts here.Tape The Edges
Protect the table’s sides. Use painter’s tape. Apply it firmly along the edges. Ensure a tight seal. This stops epoxy drips. Run tape underneath. It catches any overflow. This is a crucial step.Create A Dam (if Needed)
Some tables need a dam. This is for edges that are not flat. It holds the epoxy in place. Use wood strips or silicone caulk. Build a barrier around the top. Make sure it is secure. This dam contains the liquid. It prevents leaks. A well-built dam is essential. It ensures an even pour.Mixing The Epoxy
Properly mixing epoxy is key. Combine resin and hardener precisely. Stir slowly until fully blended. Avoid whipping air into the mix.
This is a crucial step. Proper mixing ensures a strong, beautiful finish. Incorrect mixing leads to sticky spots. It can also cause cloudy patches. Follow these steps carefully. Your tabletop will thank you.Measure Accurately
Accuracy is key. Epoxy comes in two parts. You need equal amounts. Use separate, clean measuring cups. Measure the resin. Measure the hardener. Pour them into a larger mixing container. Do not guess. Precision prevents problems.Mix Thoroughly
Now, mix them well. Use a clean stir stick. Scrape the bottom. Scrape the sides. Mix for the time recommended. This is usually 3-5 minutes. Keep scraping as you stir. Tiny streaks are still bad. Mix until it looks uniform. No more cloudy swirls.Scrape The Sides And Bottom
This is very important. Epoxy sticks to the container. It likes the sides. It likes the bottom. Make sure your stir stick reaches everywhere. Scrape often. Scrape thoroughly. This action guarantees full activation. It ensures a perfect cure.Pouring The Epoxy
Carefully pour the mixed epoxy. Let it flow evenly across the table. Ensure full coverage for a smooth finish.
This is the exciting part. You are ready to pour. Proper pouring ensures a smooth, flawless finish. Take your time. It is worth the effort.Start In The Center
Spread Evenly
Work Quickly
Bubbles Be Gone
Seal your table top with epoxy. Achieve a smooth, durable finish. Avoid bubbles for a perfect look.
Epoxy resin is beautiful. It creates a glossy, durable finish. But bubbles can ruin the look. They trap air. This makes the surface bumpy. It looks unprofessional too. Don’t worry. You can get rid of them. This section shows you how. We will tackle those pesky bubbles.Gentle Heat Application
Heat is your friend. A heat gun works well. A simple kitchen torch is also good. Hold it a few inches away. Move it constantly. Do not linger too long. Heat makes bubbles rise. They pop on the surface. This is a quick fix. You will see bubbles disappear.Patience Is Key
Sometimes bubbles need time. Small bubbles may rise slowly. They will pop on their own. Let the epoxy cure partially. Then check for bubbles. A quick pass with heat helps. This is especially true for larger pours. Don’t rush the process. Allow the resin to do its work. Your table will look amazing.Curing Time
Curing time is vital. It ensures a strong, durable finish. Do not rush this step. Patience pays off. Your tabletop needs time to harden. This process makes it tough.
Initial Cure
The surface feels dry. It is not fully hard. You can touch it gently. Avoid heavy pressure. This stage takes hours. Check your epoxy instructions. They give specific times.
Full Cure
The epoxy is completely hard. It reaches maximum strength. This takes several days. Sometimes it takes longer. Always follow the product guide. This is the final hardening.
Avoid Disturbance
Keep the tabletop still. Do not move it. Do not place objects on it. Dust is also a problem. Cover it loosely if needed. Protect your hard work. Let it cure undisturbed.

Credit: help.bestbartopepoxy.com
Finishing Touches
The final steps are crucial. They transform your epoxy table top. These finishing touches ensure a smooth, professional look. Pay close attention to these details. Your table will shine.
Remove Tape And Dams
Peel away the painter’s tape. Do this carefully. Remove the dams you created. Use a sharp utility knife. Cut along the edge of the epoxy. Go slow. This prevents tearing the cured epoxy. Clean up any small drips. A scraper works well here.
Sand Imperfections
Minor flaws might appear. Small bumps or dust specks. Sand them gently. Use fine-grit sandpaper. Start with 220 grit. Wet sanding is best. Use a sanding block. This smooths the surface. Rinse the surface often. Check your progress. Move to a finer grit. Go up to 400 grit. This removes sanding marks.
Apply Additional Coats (if Desired)
You might want a thicker layer. Or, you missed a spot. Apply another thin coat. Mix the epoxy again. Follow the same steps. Pour it evenly. Let it self-level. This builds depth. It also adds protection.
Polishing For Shine
Now, bring out the shine. Use a polishing compound. Apply it to a soft cloth. Buff the surface in circles. Work in small sections. This removes haze. It reveals a deep gloss. A buffer can speed this up. Use a low speed setting. The table top will gleam. It looks like glass.
Troubleshooting Common Issues
Even experienced DIYers face epoxy challenges. Don’t worry. Most problems are fixable. This section helps you solve them. We cover sticky spots, surface flaws, and color issues. Your tabletop will look amazing.
Sticky Spots
Did your epoxy not cure fully? Sticky spots are common. This often happens with uneven mixing. You might have used too little hardener. Or perhaps the temperature was too low. Don’t panic. You can fix this. Try gently scraping the sticky area. Use a plastic scraper. Be careful not to scratch the surface. Then, you can apply another thin coat. Make sure to mix it thoroughly. Ensure proper temperature for curing. This usually solves the stickiness.
Surface Imperfections
Bubbles or dust marring your finish? These are surface imperfections. They happen during the pour. Air bubbles can get trapped. Dust can settle on the wet epoxy. Sometimes, minor waves appear. You can fix most of these. For bubbles, use a heat gun. Wave it quickly over the surface. This pops most bubbles. For dust, gently sand the area. Use fine-grit sandpaper. Then, clean the surface well. Apply a new, thin epoxy layer. This creates a smooth, flawless look.
Color Variations
Is your color not uniform? Color variations can be frustrating. This usually means uneven pigment mixing. You might have poured too quickly. This can cause streaks. Or maybe the resin and hardener were not mixed well enough. You can sometimes fix this. If the epoxy is still wet, try swirling gently. Use a clean stir stick. You want to blend the colors. If it has cured, sanding is an option. Sand the affected area smooth. Then, reapply a tinted epoxy coat. This ensures a consistent color.
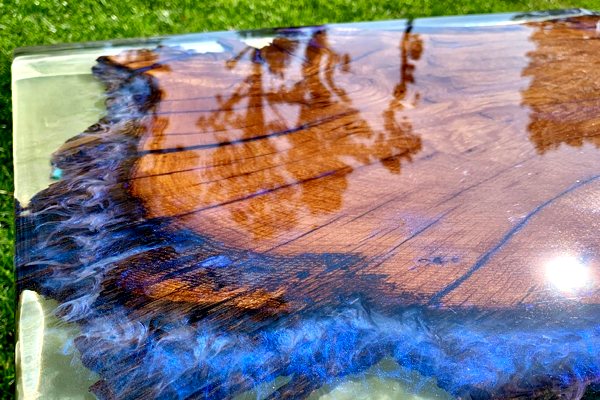
Credit: www.bestbartopepoxy.com
Epoxy Tabletop Care
Sealing your tabletop with epoxy protects its beauty. Proper care keeps your epoxy surface looking great. This process adds a durable, glossy finish.
Your epoxy tabletop is beautiful. It deserves proper care. This protects its glossy finish. It keeps your table looking new. Follow these simple steps.