
Tired of flickering lights and the high cost of replacing those old fluorescent tubes? You’re not alone!
Many homeowners and business owners are looking for a smarter, more energy-efficient lighting solution. The good news? Swapping out your old fluorescent tubes for bright, long-lasting LEDs is easier than you think. In this guide, we’ll walk you through exactly how to make the change, saving you money and hassle.
Get ready to light up your space with modern LED technology!
Why Upgrade To Led?
Thinking about swapping old fluorescent tubes? Great idea. LEDs offer many advantages. They make your home or office better. Let’s explore why.
Energy Savings
LEDs use much less power. They are very efficient. You will see lower electricity bills. This saves you money. It is a smart financial choice. Your wallet will thank you. Save energy. Save money.
Longer Lifespan
LED bulbs last a long time. They outlive fluorescent tubes. You will replace them less often. This means less hassle. Less time on ladders. Less money spent on replacements. Enjoy lights that last. A durable solution.
Improved Light Quality
LEDs provide better light. The light is often brighter. Colors look more natural. There is no flicker. This reduces eye strain. It makes spaces more comfortable. Enjoy clear, crisp light. A pleasant atmosphere.
Environmental Benefits
LEDs are good for the planet. They use less energy. This reduces carbon emissions. They do not contain mercury. Fluorescent tubes do. This makes disposal safer. Help the environment. Choose LEDs.

Credit: www.superbrightleds.com
Types Of Led Replacements
Choosing the right LED tube is crucial. Different types exist for your fluorescent fixtures. Understand these options. This ensures a smooth upgrade. Many choices offer flexibility. They fit various existing setups. Each type has unique installation needs. Know your fixture’s wiring. This guides your LED selection.
Direct-wire (ballast Bypass) Leds
These LEDs require ballast removal. You bypass the old ballast. Then, you wire the LEDs directly. This is a permanent solution. It offers maximum energy savings. Direct-wiring eliminates ballast failure. It simplifies future maintenance. Ensure you understand electrical wiring. Safety is paramount here. Consult an electrician if unsure.
Non-shunted Vs. Shunted Sockets
Fluorescent sockets have types. Some are shunted. Others are non-shunted. Shunted sockets have internal connections. Non-shunted sockets do not. Most LED tubes need non-shunted sockets. Some direct-wire LEDs work with shunted sockets. Check the LED tube’s specifications. It will state socket compatibility. Using the wrong socket type causes issues. It can damage the LED. It may prevent the light from working.
Ballast-compatible Leds
These LEDs work with your existing ballast. You simply replace the fluorescent tube. No rewiring is needed. This is the easiest option. It’s a quick plug-and-play upgrade. Ballast-compatible LEDs are convenient. They are ideal for beginners. However, the ballast still uses power. Energy savings are less than direct-wire. Ballasts can still fail eventually. This requires future replacement.
Gather Your Tools
Before you start your project, gather all your supplies. Having everything ready makes the job easier. It prevents interruptions. You will work more efficiently. This preparation is key to success.
Safety Gear
Safety first. Always wear safety glasses. Gloves protect your hands. A step stool is useful. Ensure it is stable.
New Led Tube
Buy the correct LED tube. Check the length. Verify the type of base. Read the packaging carefully. Ensure it is compatible.
Screwdrivers
You need screwdrivers. A Phillips head is common. A flathead screwdriver helps too. Have a few sizes ready. This ensures a good fit.
Wire Strippers/cutters
Wire strippers are essential. They remove insulation. Cutters trim wires if needed. Use them carefully. They are sharp tools.
Voltage Tester
A voltage tester is vital. It checks for electricity. Make sure the power is off. This is a crucial step. Never skip this test.
Electrical Tape
Electrical tape is necessary. It insulates connections. Use high-quality tape. Wrap it securely. This ensures safe wiring.
Safety First!
Safety first always. Turn off power before changing your light. Follow simple steps to swap fluorescent tubes for LED.
Safety is paramount. Always prioritize your well-being. Working with electricity demands caution. This guide ensures your safety. Follow these steps carefully.Turn Off Power
Turn Off Power
First, find your circuit breaker. Locate the breaker for your light fixture. Flip the breaker to the “off” position. This cuts all power to the light.Verify Power Is Off
Verify Power is Off
Do not assume power is off. Use a voltage tester. Touch the tester to the wires. No light means power is off. Double-check is always wise.Handle With Care
Handle with Care
Fluorescent tubes contain mercury. Handle them gently. Avoid bending or breaking them. Dispose of old tubes properly. This protects you and the environment.Removing The Old Tube
Removing the old fluorescent tube is a simple step. Safety first. Always turn off the power. This prevents electrical shock. You do not want that. Gently prepare to remove the tube. This part is easy.
Access The Fixture
Locate the light fixture. It holds the fluorescent tube. Many fixtures have a cover. Some covers slide off. Others have clips. You might need a small screwdriver. Pry gently if needed. Remove the cover completely. Now you can see the tube.
Twist And Remove
Fluorescent tubes have pins. These pins fit into sockets. The tube sits securely. You need to twist it. Turn the tube a quarter turn. It might feel stiff. Give it a gentle wiggle. The pins will release. Once loose, pull the tube down. Be careful. It is made of glass. Dispose of it properly. Some areas recycle fluorescent tubes.
Bypassing The Ballast (direct-wire)
This method skips the old ballast. You connect the LED tube directly to the power. It’s a simpler, more efficient way to upgrade.
This method is for LED tubes. They work differently. You remove the old ballast. You connect wires directly. This powers the new LED tube. It is a common and efficient way.Locate The Ballast
First, find the ballast. It is inside the light fixture. Look for a metal box. It is usually under the cover. You might need a screwdriver. Remove the fixture cover carefully.Disconnect Ballast Wires
Next, disconnect the wires. The ballast has many wires. They connect to the old bulb sockets. They also connect to the power source. Take a picture first. This helps you remember connections. Use wire cutters or strippers. Cut the wires close to the ballast. Make sure the power is off.Wire The Fixture For Direct Power
Now, wire the fixture for power. Your new LED tube needs power. It connects directly to the power source. You will use the existing house wiring. Connect the hot wire to one end. Connect the neutral wire to the other end. Use wire nuts for secure connections. Ensure all connections are tight. This powers the LED tube safely.Installing The New Led Tube
Switching your old fluorescent lights to LEDs is simple. First, turn off the power. Then, remove the old tube and insert the new LED one. Enjoy brighter, more efficient lighting.
This part is exciting. You are almost done. Replacing the old light is easy. Installing the new LED tube is simple. Follow these steps carefully. You will have bright new light soon.Insert The Led Tube
Turn off power. Always check. Make sure the power is off. Carefully remove the old tube. Hold the old tube gently. Twist it slightly. Pull it straight out. Take your new LED tube. Align the pins. Match the pins to the sockets. Push the LED tube into place. It should slide in smoothly. Do not force it.Secure The Tube
The tube needs to stay put. It will not fall out. Gently rotate the tube. Turn it until it locks. You will feel it click. This secures the tube firmly. Ensure it is seated properly. The tube should be straight. It should not wobble. Your new LED tube is now installed.Testing Your New Lights
Old fluorescent lights can be tricky. Switching to LED tubes saves energy. Test your new LED lights carefully. Ensure they fit properly and work well. Enjoy brighter, more efficient lighting.
This is the moment of truth. You have installed your new LED tubes. Now, let’s see them shine. Testing ensures everything works perfectly. It confirms your successful upgrade.Restore Power
Turn the power back on. Find your breaker box. Flip the correct switch. Your lights should now have power. Be patient for a moment.Check For Flickering
Observe the new lights. Do they flicker? Good LEDs do not flicker. Flickering indicates a problem. This might mean a bad tube. It could also signal wiring issues. Double-check your connections. Ensure the tube is seated well.Enjoy The New Light
See the bright, clean light. LEDs offer superior illumination. They use less energy too. Your space feels refreshed. Notice the difference. You have made a smart upgrade. Enjoy the benefits. `Troubleshooting Common Issues
LED conversion is usually smooth. Sometimes, problems pop up. Don’t worry. Many issues have simple fixes. This section helps you solve them.
Light Won’t Turn On
Check the power connection. Ensure the breaker is on. The LED tube might be loose. Push it firmly into place. Verify the fixture is compatible. Some older fixtures need bypassing.
Flickering Light
Flickering is annoying. It often means a bad connection. Reseat the LED tube carefully. Inspect the fixture’s wiring. Loose wires cause flickering. Consider a new fixture. Some dimmers do not work. Ensure your dimmer is LED-compatible.
Buzzing Sounds
Buzzing is uncommon. It usually points to the ballast. Remove the ballast completely. Some LED tubes do not need it. Check the tube’s instructions. Ensure proper wiring. A faulty ballast can hum. Replace it if necessary. Or bypass it for good.

Credit: www.build-review.com
Maintaining Your Led Upgrade
Upgrade your lights. LEDs use less power. They last much longer too. Enjoy bright, efficient lighting.
Your new LED lights offer many benefits. They last longer. They use less energy. Proper care ensures peak performance. This section guides you. Keep your LED upgrade in top shape.Cleaning
Dust can dim your lights. Clean them regularly. Use a soft, dry cloth. For stubborn grime, use a damp cloth. Avoid harsh chemicals. They can damage the LEDs. Ensure lights are off. Let them cool completely. This prevents damage.Periodic Checks
Check your LED tubes often. Look for any loose connections. Make sure they are secure. Listen for any strange noises. Flickering lights might signal a problem. Address issues quickly. This prevents bigger problems. Your lights will perform best.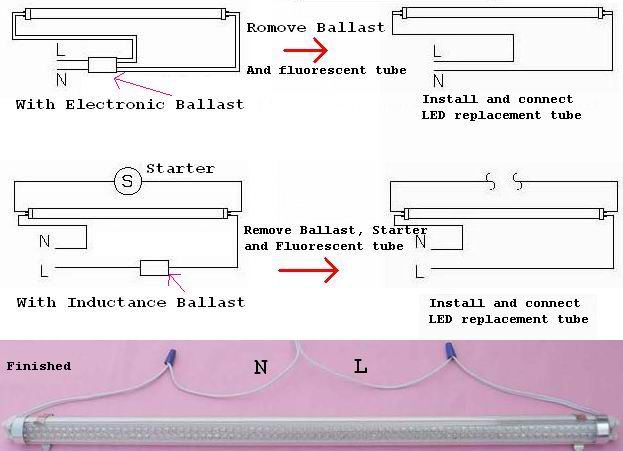
Credit: www.ledlightbulb.net
Frequently Asked Questions
Why Switch Fluorescent To Led Lights?
LEDs use less energy than fluorescents. They last much longer too. This saves you money over time.
Do I Need A New Fixture For Led Tubes?
Sometimes, yes. Some LEDs work with your old fixture. Others need a fixture made for LEDs. Check the tube’s instructions.
Can I Just Plug An Led Into A Fluorescent Socket?
Not always. Some LED tubes are direct replacements. Others need rewiring or a new ballast. Always check compatibility first.
What Tools Are Needed For This Change?
You will need a screwdriver. Maybe wire strippers too. Safety glasses are a good idea. Always turn off power first.
How Do I Safely Remove A Fluorescent Tube?
Turn off the power at the breaker. Gently twist the tube to unlock it. Pull it straight out of the sockets.
Is Rewiring A Fixture For Led Difficult?
It can be. If your LED needs rewiring, follow instructions closely. If unsure, hire an electrician. Safety is most important.
How Much Energy Do Led Lights Save?
LEDs can save up to 75% energy. They use much less power than fluorescents. This is good for your wallet.
Conclusion
Switching to LED is smart. You save energy. LED lights last much longer. Installation is quite simple. Enjoy brighter, better light. Your home will feel modern. Upgrade your lighting today. It’s an easy, worthwhile change.