
Is your recliner stuck in an upright position? Don’t let a broken D-ring recliner handle ruin your relaxation!
You’re probably frustrated that your favorite spot for unwinding is no longer functional. The good news is, replacing this small part is often a simple DIY fix. You don’t need to be a furniture expert to get your recliner working again.
In this guide, we’ll walk you through exactly how to replace your D-ring recliner handle, step-by-step. Get ready to kick back and enjoy your recliner once more!
Identify The Problem
Before fixing your recliner, you must identify the problem. This step is crucial. It guides your repair. A clear problem definition saves time. It prevents further damage.
Check The Handle Itself
Your recliner handle might be broken. Look for cracks. See if it is loose. Is the plastic worn down? A damaged handle won’t work. It needs replacement.
Inspect The Cable
The cable connects the handle to the chair. Is the cable frayed? Is it bent? Does it look stretched out? A damaged cable prevents reclining. It needs attention too.
Examine The Reclining Mechanism
The mechanism is inside the chair. It is a metal part. Does it seem stuck? Does it move freely? Sometimes the mechanism is the issue. The handle is fine.
Test The Recline Function
Try to recline your chair. Does it move at all? Does it move only a little? Does it make strange noises? This tells you what is wrong. It helps pinpoint the problem.
Gather Your Tools
Gathering your tools is the first step. It makes the job easier. You need the right things. This prevents frustration later. Have everything ready before you start.
What You Need
You need a few simple items. A new D-ring handle is essential. Make sure it fits your recliner. Check the cable length. A screwdriver is also necessary. A Phillips head screwdriver works best. Some recliners might need a flathead. A small pair of pliers can help. They grip small parts. A flashlight is useful. It lights up dark spaces. A clean cloth is handy. Wipe away dust. Have a small container. It holds loose screws.
Check Your Recliner
Look at your recliner first. See how the old handle attaches. Note the screw locations. Understand the cable path. This helps you choose tools. It guides your repair. Knowing your recliner is key.
Prepare Your Workspace
Clear the area around the recliner. You need space to work. Remove any clutter. Protect your floor. Lay down a blanket. This prevents scratches. A clean space makes work simple.
Access The Recliner Mechanism
Accessing the recliner mechanism is key. This step reveals the D-ring hardware. It lets you start the repair. Carefully inspect your recliner.
You must get to the recliner’s inner workings. This is the next crucial step. It exposes the broken D-ring. You need to see it clearly. Preparation makes this easy.
First, flip the recliner. Lay it on its back. You may need help. Be gentle with the fabric. Protect your floor too.
Look for the recliner’s underside. It has a fabric panel. This panel hides the mechanism. It usually has staples. Sometimes screws hold it.
Carefully remove the fabric panel. Use a flathead screwdriver. Gently pry it loose. If stapled, use pliers. Pull the staples out. Keep the panel safe.
Now the mechanism is visible. You can see the D-ring. It attaches to a cable. This cable connects to the lever. You are ready for the next step.
Locate The D-ring Cable
Finding the D-ring cable is your first step. This cable connects the handle to the recliner mechanism. It’s crucial for releasing the recline. Let’s find it.
Look under your recliner. You will see the recliner’s inner workings. Many cables are visible there. One of these is the D-ring cable.
The D-ring cable is usually black. It has a metal end. This end connects to the recliner’s lever. The other end attaches to the D-ring handle.
Trace the cable carefully. Follow its path from the handle. See where it disappears into the chair. This helps you understand its route.
Sometimes the cable is hidden. Upholstery may cover it. Gently lift the fabric. Be careful not to tear it. You should see the cable then.
The D-ring handle might be broken. The cable could still be attached. You need to find the cable’s anchor point. This is where the problem likely lies.
Check for kinks or breaks. A damaged cable won’t work. Inspect the entire length. Look for any signs of wear. This confirms if the cable needs replacing.
Remove The Old Handle
First, locate the old recliner handle. Gently pull it away from the chair. This step frees the mechanism.
Locate The Handle Cable
Removing the old recliner handle is simple. First, find the handle. It usually hangs near the side. You will see a cable attached to it. This cable connects to the chair’s mechanism.Access The Cable End
You need to reach the end of the cable. This end is often under the chair. Lift the recliner’s footrest. Look for the release lever. The cable attaches there. It might be hidden by fabric. Gently pull back the fabric. You can see the cable connection.Disconnect The Cable
Now, disconnect the cable. The handle end has a small metal loop. This loop hooks onto a pin or lever. Gently pull the loop off the pin. It might require a little wiggling. Be careful not to damage the cable. The old handle will now be free. You have successfully removed it.Install The New D-ring Handle
You have removed the old handle. Now it is time to install the new one. This step is simple. You will enjoy a working recliner again. Let’s get started.
Prepare The New Handle
Unpack your new D-ring handle. Check it for any damage. Make sure it matches the old one. You should see a cable attached. This cable is important.
Locate The Cable Attachment Point
Find where the old cable connected. It is usually on the recliner frame. Look for a metal bracket. This bracket holds the cable end. You might see a small hole.
Connect The New Cable
Take the cable from the new handle. Feed it through the bracket. Secure the cable end. Some handles have a clip. Others use a screw. Ensure it is snug.
Attach The D-ring Handle
Now, attach the D-ring itself. It connects to the lever. This lever is on the recliner mechanism. Align the D-ring with the lever. It should fit into a slot. Gently push it into place.
It is time to test. Gently pull the D-ring handle. The recliner should start to move. It should extend or retract. Test it a few times. Make sure it works smoothly.
Test The Mechanism
After replacing the handle, test the mechanism. Gently pull the new handle. Ensure the recliner moves smoothly. This step confirms a successful repair.
Testing the mechanism is a crucial step. It ensures your recliner works correctly. This step confirms your repair is successful.Check The Old Handle
First, examine the old D-ring handle. See how it attaches. Note the cable routing. This gives you clues.Inspect The Cable
Look closely at the recliner cable. Is it frayed or broken? A damaged cable needs replacement too. This is important.Pull The Cable
Gently pull the cable. Does it move smoothly? It should release the reclining lock. Listen for any sticking sounds.Engage The Mechanism
Now, try to engage the mechanism. Push the recliner back upright. It should lock into place easily. No force needed.Repeat The Action
Repeat pulling and engaging. Do this several times. This checks for consistent operation. A smooth action is key.Listen For Sounds
Pay attention to any noises. Grinding or clicking sounds are bad. They indicate a problem. Address these issues promptly.Feel The Resistance
Feel the resistance when pulling. It should be firm but not stiff. Too much resistance means trouble. You might need lubrication.Ensure Full Movement
Confirm the recliner moves fully. It should recline and return. Check both positions. This confirms proper function.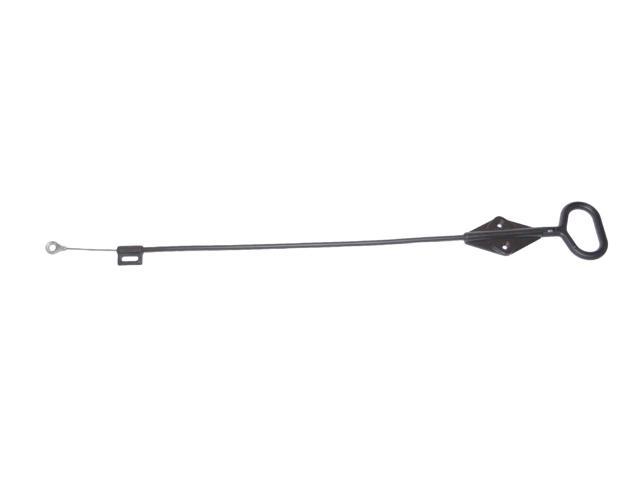
Credit: www.rosslandic.ca
Troubleshoot Common Issues
Sometimes, things do not go as planned. Your recliner handle replacement might hit a snag. Do not worry. We will help you fix common problems. You can get your recliner working again. These tips will save you time. They will also save you frustration.
Mechanism Not Engaging
The cable might be too loose. Check the connection points. Ensure the cable is secure. The recliner mechanism could be stuck. Try gently wiggling the mechanism. Sometimes, debris causes issues. Clean out any dirt or dust. The new handle might be faulty. Test the old handle again. This helps isolate the problem.
Handle Feels Loose Or Wobbly
The mounting screw might be loose. Tighten the screw firmly. Do not overtighten it. The cable might be pulling unevenly. Adjust the cable tension. Ensure it pulls straight. The handle itself may be damaged. Inspect the handle for cracks. A bent cable can cause wobbling. Straighten the cable carefully. You might need a new cable.
Recliner Does Not Move At All
The cable may have detached completely. Reattach the cable securely. Check both ends of the cable. The cable could be broken. Look for any signs of damage. A broken cable needs replacement. The recliner mechanism itself might be broken. This is a more serious issue. You may need professional help. Test the handle action. Does it feel like it pulls anything?
New Handle Won’t Fit
You might have the wrong handle. Verify the handle part number. Compare it with your old handle. Ensure the cable end fits. The slot for the cable is important. Sometimes, a small adjustment is needed. Carefully file down any rough edges. Make sure the fit is snug. A loose fit causes problems later.
Prevent Future Problems
Preventing future problems keeps your recliner working well. It saves you time and effort. A little care goes a long way. You avoid costly repairs.
Check For Wear And Tear
Inspect your recliner regularly. Look for frayed cables. Notice any loose parts. Check the handle’s attachment point. Early detection saves trouble.
Lubricate Moving Parts
Keep the recliner mechanism smooth. Use a good lubricant. Apply it to hinges and joints. This reduces strain on the handle. It ensures easy operation.
Avoid Over-pulling
Don’t yank the handle hard. Gentle pulls are best. The mechanism is not a toy. Treat it with care. This prevents stress on the cable.
Keep The Area Clear
Ensure nothing blocks the recliner. Keep the floor clear around it. Obstacles can snag the handle. They can cause sudden jerks. This protects the D-ring cable.
Follow Manufacturer Instructions
Read your recliner’s manual. It has important tips. Follow the care guidelines. This keeps your furniture in good shape. It prevents unexpected issues.

Credit: www.youtube.com
Frequently Asked Questions
What Is A D Ring Recliner Handle?
This handle is a small metal ring. It connects to your recliner’s mechanism. It helps you pull the lever to recline.
Why Would My Recliner Handle Break?
Handles can break from wear and tear. They might also break from too much force. Sometimes, the cable itself can fray.
How Do I Find The Right Replacement Handle?
Check your recliner’s make and model. Measure the old handle’s size. Look for compatible parts online.
What Tools Do I Need To Replace It?
You’ll likely need a screwdriver. Pliers can also be helpful. A new replacement handle is essential.
Can I Fix A Broken Recliner Handle Myself?
Yes, this is a common DIY repair. It usually takes less than an hour. Many people can do it easily.
Where Is The Recliner Handle Located?
The handle is typically on the side. It’s near the bottom of the chair. You’ll see it on the outside arm.
How Do I Detach The Old Handle?
First, locate the cable end. It screws or clips onto the handle. Gently twist or pull to disconnect it.
Conclusion
Replacing your recliner’s D-ring handle is simple. You can do it yourself. No need for costly repairs. Just follow the steps. Your recliner will work again. Enjoy relaxing in comfort. It’s a quick fix. A job well done.